Microsoft 365 Guideline

Updated 09 January 2023

Join Teams meetings anytime, anywhere, from any device.

Teams meetings are best when you join them from the Teams app or Teams on the web, and there are a bunch of ways to do that—read on for details about joining by link, from your calendar, and more. If you can't use the app or the web, some meetings let you call in using a phone number.

In this article


To learn more, check out the Join a Teams meeting video.

Join from calendar or ID

  1. Select Calendar on the left side of Teams to view your meetings.

    Calendar view

  2. Find the meeting you want and select Join.

Or, if someone starts the meeting, you'll get a notification you can use to join.

Join with a meeting ID from your Teams app

  1. From your Teams Calendar, select Join with an ID.

Image showing the join with meeting ID button in the top right of the Teams calendar.

2. Enter a meeting ID and passcode.

  • To find both the meeting ID and passcode, go to your calendar in Outlook. Open the meeting you want to join. At the bottom of the meeting invitation under Or join by entering a meeting ID, you'll find the ID and passcode.

Screenshot of Microsoft Teams meeting blob with "Meeting ID" option highlighted.

3. Select Join meeting to join the meeting as a participant.

Join in a channel

If a meeting takes place in a channel, you’ll see an invitation to join, relevant content, and who’s in the meeting right in the channel. Just select Join.

A meeting in a channel with a Join button

Join from chat

If the meeting has already begun, it appears in your recent chat list. Select the meeting in your chat list and then select Join at the top of the chat.

Join from chat

You can join a Teams meeting anytime, from any device, whether or not you have a Teams account. If you don't have an account, follow these steps to join as a guest.

Note: Some meetings don't allow people to join as guests.

  1. Go to the meeting invite and select Join Microsoft Teams Meeting.

    A hyperlink with text reading "Join Microsoft Teams Meeting"

  2. That'll open a web page, where you'll see two choices: Download the Windows app and Join on the web instead. If you join on the web, you can use either Microsoft Edge or Google Chrome. Your browser may ask if it's okay for Teams to use your mic and camera. Be sure to allow it so you'll be seen and heard in your meeting.

  3. Enter your name and choose your audio and video settings. If the meeting room (or another device that's connected to the meeting) is nearby, choose Audio off to avoid disrupting. Select Phone audio if you want to listen to the meeting on your mobile phone.

  4. When you're ready, hit Join now.

  5. This will bring you into the meeting lobby. We'll notify the meeting organizer that you're there, and someone in the meeting can then admit you.

Notes:

  • If no one admits you to the meeting within 30 minutes, you'll be removed from the lobby. If that happens, you can try joining again.

  • Once you're in the meeting, everyone will see a Meeting guest label with your name.

  • Some features of Teams meetings aren't available to guests.

Organizer's view

If you're the meeting organizer, we'll alert you when someone is waiting in the lobby.

Click Admit to let them right into the meeting, or View lobby to admit or deny them, as well as see a list of everyone who's waiting.

Note: Anyone that joins the meeting and doesn't have a Teams account will be labeled Meeting guest.

If you've joined a meeting on one device, you can join it on another device at the same time. For example, if you're already in a meeting on your laptop, you can also join on your phone to share live video, control a presentation with your phone, and much more.

You can either transfer the meeting to the second device or keep both devices in the meeting. 

Transfer a meeting from one device to another

  1. While you're in a meeting on one device, open Teams on the second one (the device you want to transfer the meeting to).

  2. From the new device, select Join.

    Banner message with button to join the meeting

  3. Select Transfer to this device.

    Buttons to add this device or transfer to this device

  4. You can set your audio and video preferences for the meeting on the new device, then select Join.

Once you're in the meeting on the new device, your first device will leave the meeting. 

Add a second device to a meeting

  1. While you're in a meeting on one device, open Teams on the second one.

  2. From the second device, select Join.

    Banner message with button to join the meeting

  3. Select Add this device.

    Buttons to add this device or transfer to this device

To prevent an echo effect, Teams will automatically turn off the camera and mic on the second device before it enters the meeting. Once it's joined, you'll be able to turn the mic and camera on or off as needed.

With both devices in the meeting, you can now share content from either one.

Leave a meeting on all devices

Ensure your privacy by leaving your meeting from all the devices you joined on with one tap. Whether you entered the meeting from a mobile phone, desktop, or Teams Room, you can close out your call on everything at once.

To leave a meeting on all devices:

  1. In your Teams meeting window, select the arrow next to Leave to open the Leave meeting dropdown menu.

  2. Select Leave on all my devices.

    Screenshot of Leave meeting dropdown in Teams for desktop.

When the meeting organizer sets up breakout rooms during a meeting, you’ll be able to discuss meeting items and collaborate with colleagues in a small group setting.

You may be moved into your assigned breakout room as soon as the organizer opens the room. Otherwise, you'll receive an invitation to join the room.

If you receive a notice, select Join room.

Select Join Room

Chat in a breakout room

Each breakout room has its own chat.

  • Select Chat Chat icon in the breakout room.

Note: When the breakout room closes, the room chat ends and can't be continued. However, you'll still be able to view the chat history and any shared files.

Return to the main meeting

If the meeting organizer has enabled it, select Return to rejoin the main meeting discussion.

Head back to your breakout room by selecting Join room.

There are a lot of ways to customize your video experience—and the video you share with others—when you join a Teams meeting or call.

Turn your video on or off

Before a meeting

To turn on your video before a meeting, just select Camera Camera off icon right before you join.

Select camera icon to turn camera on

During a meeting

You might want to turn your video on and off over the course of a meeting—if you'd prefer people only see you while you're talking, for example. Go to the meeting controls anytime during the meeting and select Camera Video call button.

Video off icon

Change your background

If you want to change what appears behind you in your video, you can either blur your background, or replace it entirely with any image you want.

When you're setting up your audio and video before a meeting, select Background filters Background settings(just below the video image). You'll see your background options on the right.

Note: If you don't see the option to turn on background effects, the feature might not be available on your device yet.

For more details about customizing your background, see Change your background for a Teams meeting.

Use video filters

Customize your video feed with the Soft focus and Adjust brightness filters. Soft focus creates a smoothing effect for your face over video. Adjust brightness enhances the video quality when lighting is poor.

Filters are turned off by default. To apply video filters, go to the Device Settings panel > Video Settings > then switch your desired filter toggle On.

Image showing the device settings panel with a toggle for each filter switch to the on position.

Image showing the soft-focus effect- a woman on a Teams video meeting with an airbrushed effect on her face.

Soft focus filter

Change your view

Customize how you see other people's video during a Teams meeting. For example, you may want to see as many video feeds as you can at one time in a large meeting.

Note: To provide the best possible audio and video quality, we might decrease the number of videos you're seeing at once if you're running a little low on bandwidth or device memory.

Gallery

Gallery is the default view during a Teams meeting. This view can include up to 49 other participant videos on supported devices using the Teams desktop app. Other devices may show fewer participant videos, adjusted based on the device hardware capabilities.

If there are more than 49 participants in your meeting, Teams will show the people who turned their cameras on and are speaking the most.

Notes:

  • Gallery view of up to 49 participant videos is only supported in the Teams desktop app.

  • When using pop-out, Gallery view will show up to nine video participants on any device.

  • Supported devices: Windows devices with the Intel 11th generation processor (or newer) with four or more cores and Mac devices with Apple Silicon (M1 and M2 chipsets or newer).

Screenshot of Gallery view featuring 49 (7x7) participant videos in Teams meeting.

For people who haven't turned on their videos, Teams shows their profile pic instead (or their initials if they haven't added one). Depending on hardware and device capabilities, internet bandwidth, or whether content is shared or popped out, the number of videos displayed may be reduced.

Large gallery

In large meetings, Teams' Large gallery view shows up to 49 participant videos in the meeting window at once.

Large gallery view showing 49 videos at once

Note: If no one is sharing video, Large gallery won't be selectable in the menu.

When more than 49 participants join a Teams meetings, see them all in a gallery with pages. In Large gallery view, navigation controls < > appear at the bottom of the gallery when there are more than 49 participants. Use these navigation controls to view or engage with more participants.

Together mode

Makes you feel like you're in the same shared space with everyone in the meeting. Together mode is available when there are at least five people in the meeting.

With Together mode, everyone's video appears in the same virtual space

If you're a meeting organizer or presenter, you have an assortment of scenes to choose from. To change the scene, click on the scene name in the bottom left corner of your screen.

Under Choose a scene, pick the one you want and select Apply. The scene will change for everyone who's in Together mode.

Note: The classroom scene automatically seats the meeting organizer (or whichever presenter was first to join) apart from the other participants.

Assign seats in Together mode


To assign seats in a meeting:

  1. Turn on Together mode in a meeting.

  2. Select Change scene > Assign seats.

    1. Under Select a participant, select and hold down a participant’s name. Then, drag them to a preferred seat to assign it to them.

    2. Select and hold down a seat, then drag it to a participant’s name under Select a participant to assign it to them.

  3. Select Assign to apply the new seating arrangement.

By default, everyone will see the new seating assignment in Together mode. To let attendees change their view, unselect Make this everyone’s view.

Note: Only the meeting organizer can assign seats.

2x2 (web only)

If you're using Teams on the web (Edge or Chrome browser), you'll see up to four video streams at a time. Join a Teams meeting and ask your participants to turn on their cameras to display a 2x2 grid of four participant videos at once.

Note: 2x2 video on Teams for web (Edge and Chrome) is available as part of the public preview program and may undergo further changes before being released publicly. To get access to this and other upcoming features, switch to the Teams public preview.

Focus

Available when content is being shared. This is the view to choose when you'd like to pay close attention to the content without the distraction of seeing people's video feeds.

Note: You'll need to turn on the new meeting experience to use Large gallery, Together mode, and Focus.

  1. Join your meeting.

  2. In the meeting controls, select Change your view Change meeting video layout view button and choose Focus.

Notes:

  • The Change your view feature is available as part of the public preview program and may undergo further changes before being released publicly. To get access to this and other upcoming features, switch to the Teams public preview.

  • If you're not using public preview, select More options More options button in the meeting controls to find these options.

Pin someone's video

To pin someone's video to your view regardless of who's talking, select More options More options button in their video feed (next to their name) and choose Pin.

Pin your own video

To pin your own video, select More options More options button in your video feed (next to your name) and choose Pin for me. This will pin your video for your own view, others won't see you pinned. If you no longer want to be pinned, select More options More options button > Unpin for me.

Spotlight a video

Spotlighting a video is like pinning it for everyone in the meeting. If you're an organizer or a presenter, you can choose anyone's video (including your own) to be the main video people see.

To spotlight someone else's video, right-click on the one you want and select Spotlight.

To spotlight your own video, first select Show participants. Then, under Participants, right-click your name and select Spotlight. You can spotlight anyone else's video this way, as well.

For more details, see Spotlight someone's video in a Teams meeting.

Hide your own video

To hide your own video, select More options More options button in your video feed (next to your name) and choose Hide for me. This will hide your video for your own view, others will still see your video. If you no longer want to be hidden, select More options More options button > Unhide for me.

Reframe a video

Teams crops some videos to make them fit your screen better. If you want a different view of a particular video—for example, if someone’s cropped out of the video or it only shows part of their face—select More options More options button in their video feed then Fit to frame to see the entire video.

Select Fill frame to see a closer, cropped view.

When you join a Teams meeting, you can choose to mute your mic to prevent any unwanted noise or unmute your mic to participate in the meeting.

There are a few different ways you can mute or unmute your mic in Teams.

Mute or unmute before a meeting

Before joining a meeting, you can turn your mic on or off by selecting the toggle next to Mic Mute button on the right side of your screen.

manage audio before a meeting

Mute or unmute during a meeting

To turn on your mic during a meeting, select Mic teams unmute icon in meeting controls at the upper-right area of your screen. To turn off your mic, select Mic Mute button again to mute yourself.

manage audio during a meeting

Use Ctrl+Spacebar to unmute

On the Teams desktop app, you can also choose to stay muted to avoid unwanted interruption or noise during a meeting and rapidly respond when called upon. To quickly unmute, hold down the keys Ctrl+Spacebar (Windows) and Option+Spacebar (Mac). Release keys to go back to muted state again.

How to enable:

  1. Go to Settings > Privacy. Make sure Keyboard shortcut to unmute is toggled on.

  2. Join a call or a meeting. Mute yourself.

    1. On Windows, press and hold Ctrl+Spacebar. On Mac, press and hold Option+Spacebar. You'll see an alert regarding temporary unmute. Check to make sure you're unmuted.

    2. When you release the key combination, your mic will be muted again.

Note: Shortcuts in general—including Ctrl+Spacebar and Option+Spacebar to unmute—don't work when apps like PowerPoint Live or Whiteboard are shared in the meeting stage.

Spotlighting a video is like pinning it for everyone in the meeting. If you're an organizer or a presenter, you can choose up to seven people's video feeds (including your own) to highlight for everyone else.

2 videos spotlighted at once

Notes:

  • You won't be able to spotlight a video if your view is set to Large gallery or Together mode.

Spotlight someone else's video

There are a couple of different ways to do it:

  1. Right-click on the person's video itself and select Spotlight from the menu (or Add spotlight, if someone else is already spotlighted).

    Menu with option to turn on spotlight

  2. Or, select Show participants to see a list of everyone in the meeting. Find the name of the person in the list whose video you want to highlight, right-click on their name, and select Spotlight.

When you're ready to end the spotlight, right-click again and choose Stop spotlighting. If multiple people are spotlighted, you can stop spotlighting everyone at once under Show participants.

Spotlight your own video

Two different ways to do it:

  1. Right-click on your video and select Spotlight me.

    Option to spotlight me

  2. Or, select Show participants, right-click on your name, and click Spotlight me.

Right-click again and choose Stop spotlighting to exit.

During a meeting, you can raise your hand virtually to let people know you want to contribute without interrupting the conversation.

Raise your hand

In the meeting controls at the top of the screen, select Reactions teams reaction icon> Raise your hand raise hand icon. Everyone in the meeting will see that your hand is raised.

Iage showing the Teams meeting reaction emojis with the raised hand icon highlighted.

Meeting presenters will also receive a notification that your hand is raised. In meetings where attendees can't unmute themselves, a presenter can allow you to unmute.

Tip: In addition to raising your hand, you can also choose from four live reactions to express yourself during a meeting.

See who has their hand raised

Select People teams people icon in the meeting controls at the top of the screen to see a list of everyone in the meeting. Anyone whose hand is raised will have a hand icon next to their name. If multiple people have their hands up, their names will be numbered to show, in order, who raised their hand earlier.

Image showing participants on the left of the screen with hand raise icons.

Return to Reactions teams reaction icon> Lower hand raise hand icon to put your hand down.

If you're a presenter or organizer of the meeting, you can lower everyone's hand at once:

  1. Select People teams people icon.

  2. Next to Participants, choose More options More options button.

  3. Select Lower all hands.

lower all hands menu option

Note: This feature isn't available in one-on-one calls.

During your meeting, select Reactions teams reaction icon in meeting controls at the upper-right area of the screen to express your reaction to what's being shared. Choose from a range of live reactions, including:

  • Like 3D emoji like reaction

  • Love 3D Emoji heart reaction

  • Applause 3D emoji applause reaction

  • Laugh 3D emoji laughter reaction

  • Surprise 3D emoji surprise reaction

Note: Live reactions appear when using filters and backgrounds and in breakout rooms, but not in together mode or large gallery view.

Your reaction will pop up momentarily at the bottom of your meeting and over your profile picture or video feed.

If you or someone else is sharing content in a meeting, such as a desktop, window, PowerPoint deck, photo, video, or whiteboard, reactions will float up from the bottom of the screen for a few seconds. Corresponding reactions also appear on the profile pictures of participants who send reactions.

Notes:

  • If live reactions aren’t available, check with the meeting organizer or IT admin to see if the feature has been enabled.

  • Meeting organizers can turn off live reactions in participant settings.

  • Live reactions aren’t currently available in the web version of Teams.

Using live reactions on an iOS or Android mobile device

To share meeting reactions (or raise your hand) when you’re using an iOS or Android mobile device while in a Teams meeting, tap More info More options button in meeting controls along the edge of the screen to open Live reactions.

Next, choose the live reaction you want to express. The reaction will pop up momentarily across your live video feed, or if your camera is turned off, across your profile picture.

Live reactions Mobile entry

Using live reactions on an iPad or Android tablet

To share a meeting reaction (or raise your hand) while using an iPad or Android tablet in a Teams meeting, tap Reactions teams reaction icon in meeting controls along the edge of the screen.

When live reactions appear, tap the reaction you want to express in your live video feed. If your camera is turned off, the reaction will pop up momentarily across your profile picture.

Image of live 3D emoji reactions on mobile Teams meeting.

If you or someone else is sharing content in a meeting, such as your screen, PowerPoint deck, photo, or video, live reactions will float up from the bottom of the screen for a few seconds.

Note: Live reactions don't appear on a whiteboard while using a mobile device.

Teams meetings have been redesigned to bring shared content front and center and highlight active speakers. When you join a Teams meeting, Teams smartly anticipates what you’ll want to see and resizes participant thumbnails and content based on the scenario.

When someone shares content like a presentation, Teams optimizes the layout to make that content as large as possible while also showing more video participants​.

In Together Mode, Teams increases the size of the video so you can see people’s faces while also viewing shared content.

These meeting views will be shown by default, but here are some things you can customize in your meeting.

Pin a video

To focus on a particular video, right click that video and select Pin. The video will be pinned to your view regardless of who's talking. You can pin as many videos as will fit on your screen. If you change your mind, right click that video again and select Unpin.

Spotlight someone

If you want to focus on particular people in the meeting, ​spotlight them to make them appear larger for everyone. There are a couple of different ways to do it:

  • Right-click on the person's video itself and select Spotlight from the menu.

  • Alternatively, you can select Show participants from the meeting controls to see a list of everyone in the meeting. Find the name of the person whose video you want to highlight in the list, right-click on their name, and select Spotlight.

When you're ready to end the spotlight, right-click on the person's video again and choose Stop spotlighting.

Dock people to the top of the meeting view

Change the orientation of meeting participants to the top of your screen ​ to maintain better eye contact with others while content is being shared.

When you’re in the meeting, go to your meeting controls and select More options More options button > Gallery at top.

See more participants

Large gallery view is available when at least ten people have their cameras turned on. When more than 49 participants join a Teams meetings, see them all in a gallery with pages. In Large gallery view, navigation controls < > will appear at the bottom of the gallery when there are more than 49 participants. Use these navigation controls to view or engage with more video participants.

Swap content with gallery

When you're in a meeting with gallery view and someone shares content, by default the content appears in the center of your meeting view and videos move to side or top. Select a participant's videos in gallery view to swap the content being shared with a gallery. This action brings participants' videos to the center of the meeting view and moves content like a shared desktop or PowerPoint presentation to the side or top of the meeting view.

To bring shared content back to the center of your meeting view, select the content to swap it back in.

If you want to change what appears behind you in your video meeting or call, you can either blur your background, replace it entirely with any image you want, or use Teams virtual background template.

Note: Blurring or replacing your background might not prevent sensitive information from being visible to other people in the call or meeting.

Change your background before a meeting starts

  1. While you're setting up your video and audio before joining a meeting, select Background filters Background settings. It's just below the video image.

    Your background options will display on the right.

  2. Select Blur to blur your background. You'll appear nice and clear while everything behind you is subtly concealed.

    You can also replace your background with one of the images provided, or with one of your own choosing. To use an image of your own, select Add new and then select one to upload from your computer. Make sure it's a .JPG, .PNG, or .BMP file.

Your new background will persist in all your meetings and calls until you change it again.

To turn off background effects, select Option for turning off background effect.

Note: If you don't see this option in the menu, the feature might not be available on your device yet.

Change your background during a meeting

  1. Go to your meeting controls and select More actions Microsoft Teams more options icon > Apply background effects Background settings.

  2. Select Blur to blur your background, or choose from the available images to replace it. To upload an image of your own, select Add new and pick a .JPG, .PNG, or .BMP file from your computer.
    To turn off background effects, select Option for turning off background effect.

  3. Select Preview to see how your chosen background looks before you apply it, and then select Apply.

Notes:

  • For now, Linux users aren't able to use this feature.

  • Background effects won't be available to you if you're using Teams through optimized virtual desktop infrastructure (VDI).

If people in a meeting can't hear you, you might be muted or you might not have configured your mic correctly.

To change your speaker, microphone, or camera settings when you’re on a call or in a meeting, select More options More options button> Show device settings Settings button in your meeting controls. Then, select the speaker, microphone, and camera options you want.

Audio settings for a video call

Troubleshoot microphone issues on a Mac

If you're using a Mac and you're having trouble getting your microphone to work, you might need to change one of your privacy settings.

Here's how to check:

  1. Open System Preferences

  2. Select Security & Privacy

  3. Under Privacy, choose Microphone on the left

  4. Make sure Microsoft Teams is selected

To share your screen in a meeting, select Share content Share screen button in your meeting controls. Then, choose to present your entire screen, a window, a PowerPoint file, or a whiteboard.

New share content in meeting

Notes:

  • If you're using Teams on the web, you'll be able to share your screen only if you're using Google Chrome or the latest version of Microsoft Edge.

  • In Teams on the web, you'll see the following when you select Share content Share screen button:

    Current share tray

  • Window sharing isn't available for Linux users.

Share your...

If you want to...

Great when...

Desktop

Show your entire screen, including notifications and other desktop activity.

You need to seamlessly share multiple windows.

Window

Show just one window, and no notifications or other desktop activity.

You only need to show one thing and want to keep the rest of your screen to yourself.

PowerPoint

Present a PowerPoint file others can interact with.

You need to share a presentation and want others to be able to move through it at their own pace.

Whiteboard

Collaborate with others in real time.

You want to sketch with others and have your notes attached to the meeting.

When you're done sharing, go to your meeting controls and select Stop sharing.

Share content on a Mac

If you're using a Mac, you'll need to grant permission to Teams to record your computer's screen before you can share.

  1. You'll be prompted to grant permission the first time you try to share your screen. Select Open System Preferences from the prompt.

    If you miss the prompt, you can do this anytime by going to Apple Menu > System Preferences > Security & Privacy.

  2. Under Screen Recording, make sure Microsoft Teams is selected.

    Screen recording permissions with Microsoft Teams selected

  3. Go back to your meeting and try sharing your screen again.

Note: If you're using Teams on the web, make sure you've also granted screen recording permission to your browser.

Include computer sound

Sharing computer sound lets you stream audio from your computer to meeting participants through Teams. You can use it to play a video or audio clip as part of a presentation.

To share sound, select Share content Share screen button in your meeting controls and then Include computer sound (it's the switch on the top right of your sharing options). All sound from your computer, including notifications, will be audible in the meeting.

Give and take control of shared content

Give control

If you want another meeting participant to change a file, help you present, or demonstrate something, you can give control to that person. You will both be in control of the sharing, and you can take back control anytime.

Note: When you’re sharing an app, only give control to people you trust. People you give control to may send commands that could affect your system or other apps. We've taken steps to prevent this but haven't tested every possible system customization.

  1. On the sharing toolbar, select Give control.

  2. Select the name of the person you want to give control to.

    Teams sends a notification to that person to let them know you’re sharing control. While you’re sharing control, they can make selections, edits, and other modifications to the shared screen.

  3. To take control back, select Take back control.

Take control

To take control while another person is sharing, select Request control. The person sharing can then approve or deny your request.

While you have control, you can make selections, edits, and other modifications to the shared screen.

When you’re done, select Release control to stop sharing control.

Zoom in to shared content

Want to get a better look at shared content?

Click and drag to see different areas.

And to zoom in or out, try the following:

  • Pinch in or out on your trackpad.

  • Use the keyboard shortcuts Ctrl+Plus sign and Ctrl+Minus sign.

  • Hold the Ctrl key and scroll with your mouse.

Note: Mac trackpads don't support zoom in meetings. If you're on a Mac, use one of the other options. If you're using Linux, giving and taking control of shared content isn't available at this time.

Pop out shared content in new window

Expand your view by popping out shared content in a separate window during your Teams meetings.

To pop out shared content:

  1. Join your meeting from Teams for desktop.

  2. When another presenter shares content in the meeting window, select Pop out from the meeting toolbar.

    Screenshot of Pop out option in Teams meeting toolbar to open shared content in separate window (desktop).

  3. To pop content back into the meeting window, select X to close the pop out.

PowerPoint Live in Teams gives both the presenter and audience an inclusive and engaging experience, combining the best parts of presenting in PowerPoint with the connection and collaboration of a Microsoft Teams meeting.

When you’re the presenter, you have a unique view that lets you control your presentation while staying engaged with your audience, seeing people’s video, raised hands, reactions, and chat as needed.

And if you’re an audience member, you can interact with the presentation and personalize your viewing experience with captions, high contrast slides, and slides translated into your native language.

Here’s how it works:

Tip: Are you an audience member? Jump down to learn more about how you can interact during the presentation.

Presenter view

PowerPoint presentation in Teams

Present your slides

  • If you’re already in a Teams meeting, select Share and then under the PowerPoint Live section, choose the PowerPoint file you’re wanting to present. If you don’t see the file in the list, select Browse OneDrive or Browse my computer.

    PowerPoint Live sharing file options

  • If your presentation is already open in PowerPoint for Windows or Mac, go to the file and select Present in Teams.

    Present in Teams button

  • If you're in PowerPoint for the web, select Present > Present in Teams.

Your slides will appear in the Teams meeting, with your Notes next to them.

Navigate through the slides

You have several tools to use while you present your slides.

Navigation arrows in PowerPoint Live

  • Use the navigation arrows to go forward and backward.

  • Use the thumbnail strip to jump ahead or backwards.

  • Select Go to slide to see a grid view of all slides in the presentation. Select one to jump to it.

Stay connected to the audience

One of the benefits of using PowerPoint Live to present instead of sharing your screen is that you have quick access to all your meeting tools you need to engage with the audience and to read the room in one view. This is especially true if you’re presenting from a single screen.

  • Turn Chat on or off to view what your audience is saying.

  • See audience reactions and raised hands in real-time.

  • Change the Layout of your presentation and choose how your live camera feed appears in your presentation, like Standout or Cameo. It helps the audience read your non-verbal cues and keeps them engaged.

  • Use the Laser pointer, Pen, Highlighter, or Eraser to clearly reference items on your slides.

Audience view

As an audience member, you’re able to personalize your experience without affecting anyone else. Try these options to find what works best for you:

  • Use the navigation arrows to move around to different slides. Go back to check on information you may have missed or go forward to preview upcoming slides. You can always get back to where your presenter is by selecting Sync to Presenter.

    Select Sync to Presenter, next to the navigation arrows

    Note: If presenters don't want people to be able to independently navigate through a PowerPoint file they are sharing, use the Private view toggle to turn it off.

  • Click any hyperlink on slides to get more context right away.

  • Interact with videos on slides to adjust the volume or jump to a timestamp and consume it at your own pace.

  • Use a screen reader to get full access to the slide content.

  • Translate the slides into one of 19 languages. Select More options > Translate slides and then choose a language.

    Select Translate slides

  • Switch to a high contrast view to make the slides easier to view if you have low vision. Select More options > View slides in high contrast.

  • Your viewing experience will be at a higher fidelity, letting you see crisp text and smooth animations. PowerPoint Live also requires significantly less network bandwidth than typical sharing, making it the best option when network connectivity is a problem.

Important:

  • PowerPoint Live is not supported in Teams live events.

  • If you're using Teams on the web, you’ll need Microsoft Edge 18 or later, or Google Chrome 65 or later, to see the presenter view.

  • Presenter view is hidden by default for small screen devices but can be turned on by selecting More options below the current slide and then Show presenter view (or by selecting the sharing window and then pressing Ctrl+Shift+x).

  • Meetings recordings won’t capture any videos, animations, or annotation marks in the PowerPoint Live session.

  • When you share from Teams, the PowerPoint Live section lists the most recent files you've opened or edited in your team SharePoint site or your OneDrive. If you select one of these files to present, all meeting participants will be able to view the slides during the meeting. Their access permissions to the file outside of the meeting won't change.

  • If you select Browse and choose to present a PowerPoint file that hasn't been uploaded to Teams before, it will get uploaded as part of the meeting. If you're presenting in a channel meeting, the file is uploaded to the Files tab in the channel, where all team members will have access to it. If you're presenting in a private meeting, the file is uploaded to your OneDrive, where only the meeting participants will be able to access it.

When using PowerPoint Live to share content in a Teams meeting, emphasize your points and engage viewers with the colorful laser pointer and drawing tools. Your “ink” will be visible to everyone in the meeting.

Only the presenter can point and draw on the slides.

To begin sharing, see Share PowerPoint slides. You'll see the laser pointer and drawing tools beneath the current slide.

Pointer and drawing tools below current slide

Focus viewer attention with the laser pointer

  • Select the laser pointer pointer icon and a color to make temporary marks on the current slide.

    Pointer tool is second one after 3 dots

To create a short line simply move the mouse around. To create a longer line, press and hold the mouse button as you draw.

Tip: If you quickly make several marks, they will all be visible at the same time and then fade away together.

Highlight and connect ideas with the drawing tools

These markings will last throughout the meeting.

  1. Select one of these drawing tools and then a line thickness and color.

    The pen pen icon draws an opaque line

    Pen tool is third one after 3 dots

    The highlighter highlighter icon draws a translucent line.

    Highlighter tool is fourth one after 3 dots

  2. Press and hold the mouse button as you draw.

Erase your ink marks

  • To erase a single mark, select the eraser eraser icon and then an ink mark.

  • To erase all the marks, select Erase all ink on slide.

    Eraser tool is fifth one after 3 dots

Stop drawing

  • Select the cursor Cursor tool is first one after 3 dots (or press the Esc key on the keyboard).

Your calendar in Teams is connected to your Exchange calendar. In other words, when you schedule a meeting in Outlook, it'll show up in Teams, and vice versa.

Every meeting scheduled in Teams is automatically made into an online meeting.

Note: Up to 1,000 invitees can join a Teams meeting and interact by using chat, audio, and video. Invitees can also join a meeting that already has 1,000 participants (up to 10,000) as view-only attendees.

Schedule a meeting

There are several ways to schedule a meeting in Teams:

  • Select Schedule a meeting Schedule a meeting button in a chat (below the box where you type a new message) to book a meeting with the people in the chat.

  • Go to Calendar Meetings button on the left side of the app and select New meeting in the top right corner.

  • Select a range of time in the calendar. A scheduling form will pop open.

The scheduling form is where you'll give your meeting a title, invite people, and add meeting details. Use the Scheduling Assistant to find a time that works for everyone.
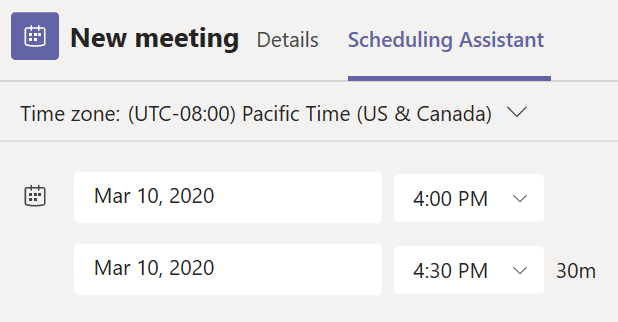
Scheduling Assistant tab in the Teams new meeting scheduling form.

Once you're done filling out the details, select Save. This will close the scheduling form and send an invite to everyone's Outlook inbox.

Assign categories to a meeting

Color code your calendar with categories. Just like in Outlook, you can assign one or more categories to each meeting in your calendar. There are a couple ways to assign categories:

  1. Right-click an event in your calendar and select Categorize, then pick a color.

  2. When scheduling a meeting, select Category at the top of the scheduling form.

Notes:

  • At this time, category names and colors can only be edited from Outlook.

  • For recurring meetings, categories can only be applied to the series, not an individual occurrence.

  • Currently, categories can't be applied to channel meetings.

Invite people outside your organization

Teams lets you invite people outside your organization, including those who don't have a Teams license. You'll need their full email address to invite them.

  1. Go to where it says Add required attendees. If anyone is an optional attendee, select Optional instead.

  2. Type the person's full email address (ex: Joe@example.com).

  3. Select Invite. They'll receive an email with a link to the meeting.

Make it a channel meeting

  1. Select New meeting.

  2. Type the name of a channel where it says Add channel (under the time and date fields).
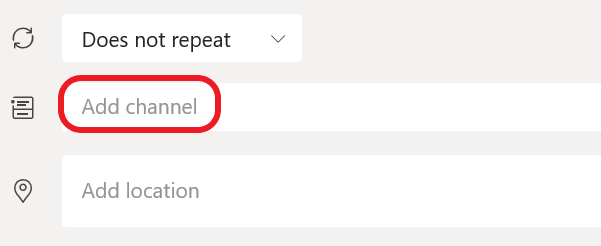
Add channel to a Teams meeting.

Channels can't be edited or added once the invite is sent. You'll need to send a new invite with the updated channel.

Note: When you have a meeting in a channel, everyone in the team will be able to see it and join it in that channel. This feature isn't available in private channels.

Once you've added the people you want, select Scheduling Assistant to find the best time.

If it's a recurring meeting, open the dropdown menu next to Does not repeat (just below the date). Choose how often you want it to occur from the default options, or select Custom to create your own cadence.

Schedule meetings in a channel calendar

If you're unfamiliar with how to add a calendar to a channel, the steps are outlined for you at See all your meetings in Teams. Once that's done, you have a few ways to add events to the shared calendar.

  • Select Add new event at the top of the calendar.

  • Click and drag your cursor on the calendar to select a block of time.

  • Or, select the arrow next to Meet now at the top of the app to open the menu and select Schedule meeting.

Each of these actions will open the scheduling form with the channel name filled in, feel free to add an Outlook group or individuals by manually entering their names. Guests and partners from outside your org won't have access to the channel calendar and will also require being added to the meeting invite.

Right-click for more options

Right-click an event in your calendar to RSVP, remove it if it's canceled, or open the invitation to view the meeting details. If the event is a Teams meeting, you'll also get options to Join online and Chat with participants.

Context menu of a calendar event in Teams.

Teams meetings will show a join button on an event in your calendar five minutes before the start of a meeting. Once someone joins the meeting, the event will change colors to let you know they're online.

Select Join to open the meeting settings window to confirm your preferred camera and mic settings before joining the online meeting.

Note: If you have overlapping meetings in your calendar, the join button won't be available. But you can still right-click the event and select Join online.

Set your Show As status in a Teams meeting

As an organizer, you can set the Show As status of the meeting in the action bar. When participants RSVP, their status will automatically reflect the status the organizer set.

As a participant, you can choose to set your individual status for the meeting through Show As independent of the status set by the organizer. The updated status will reflect on your calendar. The default Show As value for all the meetings an organizer schedules is Busy.

You can set your Show As status in several ways:

On the Scheduling Form Details page

Image displaying how to set a status in a Teams meeting using the drop down status menu.

On your Peek of the meeting (Microsoft Surface)

Image displaying the Show As flyout menu with potential statuses.

On the Details view of the meeting (as a participant)

Image displaying the Test Meeting screen with menu of available statuses.

In this article

Schedule a Teams meeting

Remove Teams from a meeting

Make all meetings Teams meetings

Schedule a Teams meeting

Outlook on the desktop

  1. Open Outlook and switch to the calendar view.

  2. Select New Teams Meeting at the top of the view.

    New Teams Meeting in Outlook

    Note: Even if you begin by selecting New Meeting or New Appointment, you can make it a Teams meeting by selecting Teams Meeting at the top of the new event form.

  3. Add your invitees to the Required or Optional field(s)—you can even invite entire contact groups (formerly known as distribution lists).

  4. Add your meeting subject, location (if applicable), start time, and end time.

  5. Create your message.

  6. Select Send.

Note: The Teams meeting join details are added to the meeting invite automatically.

If you don’t see the New Teams Meeting icon in the desktop version of Outlook, the Teams add-in for Outlook might not be installed properly.

Outlook on the web

  • In the new event form, select the Teams meeting toggle to turn it on.

    The Teams meeting toggle is on the right

After the invite is sent, you'll see the meeting join details in the event.

Remove Teams from a meeting

You can remove Teams from a meeting while you're creating the meeting, but not after you send the invitation.

Outlook on the desktop

  • At the top of the new meeting form, select Settings > Don't Host Online.

    Select Don't Host Online

​​​​​​Outlook on the web

  • In the new event form, select the Teams meeting toggle to turn it off.

Make all meetings Teams meetings

You can turn on a Calendar option so that all the meetings you schedule from Outlook—including Outlook on the web and mobile—will be held online with Teams.

Note: Depending on the release update schedule for your organization, you may not currently have access to this feature.

Outlook on the desktop

  1. At the top of the Outlook screen, select File > Options.

  2. On the Outlook Options page, select Calendar on the left.

  3. Under Calendar options, select Add online meeting to all meetings.

    Select Add online meeting to all meetings

Outlook on the web

  1. At the top right of the screen, select Settings Settings button and then View all Outlook settings at the bottom right.

  2. Select Calendar > Events and invitations > Add online meetings to all meetings.

    Select Add online meeting to all meetings

  3. Select Save.

Instead of sending out meeting invitations that contain a Join meeting link, you can publicize your meeting and have attendees register. You’ll cast a wider net for attendees, and it will allow your attendees to provide important info about their interests.

In this article

About meetings with registration

Schedule the meeting

Customize the registration form

Send the invite

Publicize the meeting

View the registration report

Add presenters after sending the invite

Edit meeting details and inform participants

Cancel the meeting

View the post-meeting attendance report

About meetings with registration

In meetings with registration, the organizer and presenters have more control than in a regular meeting. By default, attendees:

  • Wait in the lobby until the organizer or a presenter lets them into the meeting.

  • Cannot share content.

If the meeting is open to the public, attendees are muted and their video is turned off when they join.

Presenters may use polls during the meeting to engage the audience and gather info.

Schedule the meeting

  1. In the Teams calendar, select New meeting.

    Select New meeting in the top right of the calendar

  2. On the New meeting page, select Require registration and then either For people in your org or For everyone (for a meeting open to the public).

    Select Require registration under Meeting options

    Notes:

    • If you don’t see the Require registration option, contact your IT admin.

    • If you want to schedule a public meeting but don’t see the For everyone option, contact your IT admin.

  3. On the New meeting page, enter a title for the meeting, date, start and end times, and a description.

    The info that you enter on this page is for the meeting presenters only—attendees won’t see it. If you want, you can set a different start time for meeting attendees so that you’ll have time to prepare with the presenters before the attendees join. (See Customize the registration form for instructions.)

    Note: We suggest that you set the meeting policy to have attendees wait in the lobby so that you or a presenter can let them into the meeting when you're ready. For instructions, see Change participant settings for a Teams meeting.

Add presenters (optional)

To allow people besides yourself to present content during the meeting, list them on the invite. Presenters don’t need to register for the meeting.

Note: If you add presenters after sending out the meeting invite, you’ll need to perform additional steps; see Add presenters after sending the invite.

  1. In the Add required presenters space, enter their names.

    Add required and optional presenters

  2. If there are optional presenters, select Optional presenters and enter their names.

An anonymous presenter will join the meeting as an attendee. You'll need to make them a presenter for them to be able to share content:

  1. Click Show participants in your meeting controls to see a list of all the people in the meeting.

  2. Point to the name of the person whose role you want to change and select More options > Make a presenter.

Customize the registration form

Potential meeting attendees get this form when they select the meeting registration link. They fill it out and submit it to receive the Join link for the meeting.

  • To begin, select View registration form.

    Select View registration form

Add a custom image (optional)

You can add a banner or other image to the top of the attendee registration form.

  1. Select Add an image at the top of the page.

  2. Select Upload an image, locate and select the image you want to use, and select Done.

  3. Select Done again.

To remove the image, select the X in the upper-right corner of the page.

Enter basic meeting details for attendees

  • Enter the meeting title, date, start and end times, and description. You can also list the speakers, along with their bios.

    The info that you enter on this page is for the meeting attendees. If you want, you can set a different start time for meeting presenters so that you’ll have time to prepare with the presenters before the attendees join.

    To have attendees wait in the lobby before being admitted to the meeting, see Change participant settings for a Teams meeting.

    Event details section

Choose additional fields

The form that attendees will complete includes three required fields: First name, Last name, and Email. You decide the rest.

  1. Under Register for this event, select Add field to view a list of commonly requested fields.

    Select Add field

  2. To add one of the listed fields, select it.

  3. When the field appears on the form, select the Required box if you want to oblige attendees to provide that info. (They won’t be able to register for your meeting if they leave the line blank.)

    Required check box is next to Organization

  4. Repeat steps 1-3 as needed. To delete a field, select the X to its right.

Create custom fields

You can request any amount of additional info, perhaps related to your meeting’s marketing goals or to help plan your training session.

  1. Select Add field > Custom question and indicate whether the attendee will be entering info in the questionnaire (select Input) or choosing from options you supply (select Choice).

    Select Input or Choice

  2. If you chose Input, enter your question in the field under Custom question.

    Input is the top option

  3. If you chose Choice, enter your question under Custom question, select Add option until you have the number of choices you want to provide, and then enter the choices.

    Choice is the second option

  4. To preview your registration form, select View in browser at the top right of the page.

  5. When you’re done, select Save.

  6. To close the form, select the X in the upper-right corner.

Note: The registration form is created as a web form on the organizer's Mysite on SharePoint. Registrants will enter their registration data through a TLS-encrypted connection between their browser and the SharePoint service. When a registrant submits a registration, SharePoint stores the data, encrypted, directly to your organization's SharePoint data storage location as a list on the organizer's Mysite.
Organizers can respond to requests from registrants to exercise data subject rights by directly accessing their registration lists in SharePoint. Admins can use the DSR guidance provided at Office 365 Data Subject Requests for the GDPR and CCPA.

Send the invite

After you’ve completed the basic info for both presenters and attendees, added any additional presenters, and customized the registration form, send out the invite.

Important: You need to do this even if you’re the only presenter.

  • Select Send in the upper-right corner of the page.

The presenters will receive the invite.

The registration link will become active so that prospective attendees can register.

Publicize the meeting

Build excitement and gather an audience for your meeting by sharing the details and registration link with potential attendees. You may want to publicize the event through social media, websites, email, chats, and so on. (The link becomes active after you send out the meeting invite.)

Copy the registration link

  1. Double-click the meeting event in your calendar.

  2. Select Copy registration link near the top of the page.

    Select Copy registration link under the meeting title

Note: You can also copy the link from the registration form.

Now you can paste the link into your announcements and messages.

View the registration report

After sending the meeting invite and publicizing your meeting, track who registered and what they entered on the registration form.

  1. In your calendar, double-click the meeting.

  2. Select the Registration button to download the report.

    Select the Registration button

Add presenters after sending the invite

When you add presenters to the meeting after you’ve sent the invite, you must give them permission to present. You can do this by changing a meeting option before the meeting or by changing their role during the meeting.

Note: To add an external (guest) presenter, follow the second procedure.

To add a presenter before the meeting:

  1. Double-click the event in your calendar.

  2. Add the new presenter to the Presenters or Optional presenters line in the invite.

  3. Select Send update in the upper-right corner of the screen.

  4. Double-click the event in your calendar.

  5. Next to Go to meeting options, select Change options.

    Select Change options to the right of Go to meeting options

  6. On the Meeting options page, next to Who can present?, enter the name of the additional presenter.

    Select Specific people (the third option)

  7. Select Save at the bottom of the page.

To let meeting attendees know about the new presenter, see Edit meeting details and inform participants—To inform registered attendees.

To change someone's role during the meeting:

  1. Send the meeting join info to the person that will be presenting. The info is available towards the bottom of the meeting event in the calendar, under Microsoft Teams meeting.

  2. At meeting time, let the presenter into the meeting.

  3. Click Show participants in your meeting controls to see a list of all the people in the meeting.

  4. Point to the name of the person whose role you want to change and select More options > Make a presenter.

Edit meeting details and inform participants

To inform presenters:

Changes to any of the basic meeting info (title, presenters, date, and time) will be emailed to the presenters.

  1. In your calendar, double-click the meeting event.

  2. Make your changes.

  3. Select Send update in the top right of the page.

To inform registered attendees:

Changes to the date and time will be emailed to the registered attendees.

  1. In your calendar, double-click the meeting event.

  2. Select Customize registration form.

  3. Select Edit in the upper-left corner of the form.

  4. Make your changes.

  5. Select Save in the upper-left corner of the form.

  6. Important: In the Send update? box, select Send.

Cancel the meeting

A cancellation email will be sent to the presenters and registered attendees.

  1. In your calendar, double-click the meeting event.

  2. Select Cancel meeting in the top left of the page.

  3. Add a cancellation message and select Cancel meeting.

Note: Attendees can cancel their registration from the email that contains their Join link.

View the post-meeting attendance report

After the meeting, download the attendance report to see who joined the meeting and for how long. You can compare this with the registration report to get a fuller picture of the meeting’s success.

  1. In your calendar, double-click the meeting event.

  2. Select the Attendance button to download the report.

    Attendance download button

Before a meeting

In your Teams calendar, when scheduling or editing a meeting, use the Add required attendees or Add optional attendees box to search for and invite people. Then, you can use the scheduling assistant to see times when everyone is free. For details, see Schedule a meeting.

You can also schedule a Teams meeting and invite people from Outlook. For details, see Schedule a Teams meeting from Outlook.

During a meeting

When you're in a meeting, select Show participants Add people to team button in your meeting controls to see the people who were invited but haven't joined yet.

To ask someone who was invited to join the meeting, point to their name and select Request to join.

You can also type a person's name or phone number in the search box to add someone who was not previously invited.

Note: Up to 1,000 invitees can join a Teams meeting and interact by using chat, audio, and video. Invitees can also join a meeting that already has 1,000 participants (up to 10,000) as view-only attendees.

Meeting roster

After you've invited people to your meeting, you can add up to 10 co-organizers to help manage your meeting. Co-organizers are displayed as additional organizers in the meeting participant list and have most of the capabilities of the meeting organizer.

Note: Teams does not currently support adding co-organizers to webinars.

Co-organizer capabilities

Co-organizers can:

Co-organizers can't:

Access and change meeting options

Change meeting options during channel meetings.

Become a breakout room manager

Manage the meeting recording

Bypass the lobby

Remove or change the meeting organizer's role

Admit people from the lobby during a meeting

Lock the meeting

Present content

Change another participant’s meeting role

End the meeting for all

Note: To make co-organizers breakout room managers, you must first assign them the breakout room manager role.

Add co-organizers to a meeting

To add co-organizers to a meeting, make sure the people you want to add are already required attendees then follow the steps below:

  1. Select your meeting and then choose Edit.

  2. Select More options More options icon > Meeting options.

  3. On the meeting options page, next to Choose co-organizers, select the down arrow and choose the name of the additional co-organizer(s).

    add a co-organizer to a meeting

  4. Select Save at the bottom of your screen.

Note: Co-organizers must be in the same organization as the meeting organizer, or be using a guest account in the same org.

If you're organizing a meeting with multiple attendees, you may want to assign roles to each participant to determine who can do what in the meeting.

There are three roles to choose from: co-organizer, presenter and attendee. Co-organizers and presenters share most organizer permissions, while attendees are more controlled.

Below are the specific capabilities of each role:

Meeting participant capabilities

Capability

Organizer

Co-organizer

Presenter

Attendee

Speak and share video

checkmark

checkmark

checkmark

checkmark

Participate in meeting chat

checkmark

checkmark

checkmark

checkmark

Share content

checkmark

checkmark

checkmark

Privately view a PowerPoint file shared by someone else

checkmark

checkmark

checkmark

checkmark

Take control of someone else's PowerPoint presentation

checkmark

checkmark

checkmark

Mute other participants

checkmark

checkmark

checkmark

Prevent attendees from unmuting themselves

checkmark

checkmark

checkmark

Remove participants

checkmark

checkmark

checkmark

Admit people from the lobby

checkmark

checkmark

checkmark

Change the roles of other participants

checkmark

checkmark

checkmark

Start or stop recording

checkmark

checkmark

checkmark

Start or stop live transcription

checkmark

checkmark

checkmark

Manage breakout rooms

checkmark

checkmark

Change meeting options

checkmark

checkmark

Add or remove an app

checkmark

checkmark

checkmark

Use an app*

checkmark

checkmark

checkmark

checkmark

Change app settings

checkmark

checkmark

checkmark

*Some apps may limit what certain roles can do.

Change meeting roles

Before a meeting

You'll need to send out the meeting invite before you can assign roles.

Once you've done that, go to Calendar Schedule a meeting button, double-click the meeting you just created, and select Meeting options.

This will bring you to a web page, where you'll see a few choices under Who can present?

Who can present?

What happens

Everyone

Anyone who has access to the meeting link will join the meeting as a presenter.

People in my organization

Only people in your org will be presenters. External participants will join as attendees.

Specific people

Only people you choose from the list of invitees will be presenters. Everyone else will join as attendees.

Only me

Only the organizer will be a presenter. All other participants will join as attendees.

A couple of things to keep in mind:

  • You'll need to send your meeting invite directly to anyone you want to select as a presenter.

  • Co-organizers can't make changes to a meeting before it starts.

  • The role of the meeting organizer can't be changed.

Note: The ability to select specific presenters isn't yet available for channel meetings.

During a meeting

There are two ways for you or a co-organizer to change someone's role while a meeting is in progress:

  • Go to Calendar Meetings button,double-click the meeting, and select Meeting options. Use the dropdown menu for Who can present? to select a new presenter.

    Note: If the meeting is recurring, any change you make in Meeting options will apply to all meeting occurrences.

  • Select Show participants in the meeting controls to see a list of all the people in the meeting.

    Hover over the name of the person whose role you want to change and select More options. From there, select Make a presenter or Make an attendee.

    Notes:

    • If the meeting is recurring, role assignments made in this way will only apply to the current meeting. For future occurrences, participants will keep the role assigned to them on the Meeting options page.

    • If someone exits the meeting and then rejoins it later, they'll rejoin with the last role they were assigned.

Prevent mic and camera use

Before the meeting

After scheduling the meeting and sending out the invite, the meeting organizer can disable the mics and cameras so that attendees can't use them during the meeting. All attendees (but not presenters) will join the meeting with mic and camera off.

  1. Go to Calendar and double-click the meeting.

  2. Select Meeting options near the top of the screen.

    'Meeting options' near the top of the screen

  3. Turn off the Allow mic for attendees? or Allow camera for attendees? toggle and select Save.

    Meeting options in Teams, a red box surrounds the setting to manage attendee mic and camera permissions.

During the meeting

The organizer and presenters can disable the mic or camera of all the attendees, or of individuals, at any time during the meeting.

Note: Currently this option isn't available to organizers and presenters who join the meeting from Teams room devices.

To disable all attendee mics or cameras

  • Select More options Microsoft Teams more options icon next to Participants and then Disable mic for attendees or Disable camera for attendees.

    Don't allow attendees to unmute option

    Attendee mics and cameras will appear dimmed.

    Mics of attendees are dimmed

Tip: If you just want to mute participants without disabling their mics, select Mute all participants.

If later you want to enable everyone's mic or camera, select More options Microsoft Teams more options icon again and then Allow mic for attendees or Allow camera for attendees.

To disable an individual's mic or camera

  • Select More options Microsoft Teams more options icon next to their name and then Disable mic or Disable camera.

    Select Disable mic or Disable camera

Tip: Attendees can signal that they want to speak by raising their hands.

Allow someone to unmute or share their video

  • Select More options Microsoft Teams more options icon next to the name of the person and then select Allow mic or Allow camera.

    Select Allow mic or Allow camera

That person can now unmute themselves or share video.

Go to Meeting options

You can access this page a few different ways, depending on what kind of meeting it is.

Scheduled meetings

There are several different ways to get to Meeting options for a scheduled meeting:

  • In Teams, go to Calendar Meetings button, select a meeting, and then Meeting options.

  • In a meeting invitation, select Meeting options.

  • During a meeting, select More actions More options icon at the top of the meeting window, and then Meeting options. A panel will open on the right, and you can change your options right from there.

  • Another way to get there during a meeting is to select Show participants Show participants icon in the meeting controls. Then, above the list of participants, choose Manage permissions The manage participants icon in Microsoft Teams.

Instant meetings

Once you've started a meeting by selecting Meet now Meet now button (whether from a channel or your calendar):

  1. Choose Show participants Show participants icon in your meeting controls. You'll see a list of everyone in the meeting.

  2. Above the list, select Manage permissions The manage participants icon in Microsoft Teams to go to Meeting options.

    Another way to get there during your meeting is to select More actions at the top of the meeting window, and then Meeting options. A panel will open on the right, and you can change your options right from there.

Change participant settings

There are several different participant settings a meeting organizer can change.

Choose who can bypass the lobby

As the meeting organizer, you get to decide who gets into your meetings directly, and who should wait for someone to let them in.

If you choose to have people wait, you (and anyone else allowed to admit people) will see a list of people in the lobby. From there you can choose whether to admit or deny them.

Who can bypass the lobby?

What happens

Recommended when...

Only you

As the meeting organizer, only you can get into your meeting directly. Everyone else will wait in the lobby.

You want everyone else to wait in the lobby until you're ready to admit them.

People I invite*

Anyone who receives the invitation, including those to whom it's forwarded, will join the meeting directly. This doesn't include distribution lists—people must be invited individually. If you don't want people to forward the invite to others, turn off Allow Forwarding in the invitation.

You want a specific, limited group of people to join the meeting directly, and everyone else to wait in the lobby.

People in my organization

Only people within your org can get into your meeting directly. Everyone else will wait in the lobby.

You want all guests and external people to wait in the lobby so you can approve them one by one.

People in my organization and guests

People in your org and guests (including those who have different email domains than yours) can get into your meetings directly.

You want all external people (anyone outside your org, except guests) to wait in the lobby so you can approve them one by one.

People in my organization and trusted organizations, and guests

People in your Teams org, external participants from trusted organizations, and guests can get into your meetings directly.

You want some external people to wait in the lobby so you can approve them one by one.

Everyone

Anyone who has access to the meeting link gets into the meeting directly, including people who call in.

Depending on the meeting policy or settings, anonymous users may still be placed into the lobby even if Everyone is selected.

You don’t want anyone to wait in the lobby. You want everyone to be able to join your meetings without specific approval.

* Unavailable in channel meetings

Important: In large Teams meetings (300 or more attendees), adjust Who can bypass the lobby? to a minimum of People in my organization.

Let people calling in by phone bypass the lobby

You'll see a toggle next to Always let callers bypass the lobby. When this setting is enabled, people calling in by phone will join your meeting without having to wait for someone to admit them.

Select the toggle to turn it on or off.

Get notified when callers join or leave

You may want to receive an alert when someone calling in by phone joins or leaves your meeting. (Your admin might have enabled these alerts by default.)

To change this setting, select the toggle next to Announce when callers join or leave?

Choose who can present

See Roles in a Teams meeting for details about selecting presenters and changing someone's role before and during a meeting.

Note: Meeting rooms are part of your org, so they'll join meetings the same way any other account in your org does.

Prevent attendees from unmuting themselves and sharing video

To avoid distractions in large meetings, you may want to decide when attendees can unmute and share their video. For details, see Manage attendee audio and video permissions.

To prevent attendees from unmuting, turn off the toggle next to Allow mic for attendees?.

To prevent attendees from sharing video, turn off the toggle next to Allow camera for attendees?.

Record automatically

If you turn on this option, a recording and transcription of your meeting will begin as soon as the meeting starts. For more info, see Record a meeting in Teams.

Allow meeting chat

In general, people who are on the meeting invite can participate in a meeting chat before, during, and after the meeting.

If you select Disabled for this option, there will be no meeting chat at any time.

If you select In-meeting only, meeting chat will be unavailable before and after the meeting.

Allow reactions

You can choose whether or not people are able to use live reactions in a meeting. If you choose not to allow it, they will still be able to raise their hand. For more info, see Express yourself in Teams meetings with live reactions.

Lock a meeting

In a Teams meeting, meeting organizers can choose to lock their meetings to prevent subsequent join attempts. Anyone attempting to join a locked meeting from any device will be informed that the meeting is locked.

To lock a meeting from a desktop, select Schedule a meeting > Join > Participants > ... > Lock the meeting (or unlock it when locked).

When a meeting is locked, no additional participants will be able to join, but invitees can still access the meeting chat, recording, and other meeting info.

Image showing the Participants dropdown with lock meeting option.

Image showing the lock meeting screen with "Lock" button at the bottom.

Note: Once participants leave the meeting, they will not be able to join again until the meeting is unlocked.

Change your calendar view to suit how you like to work, and quickly jump forward to upcoming events or back through the past.

Change the calendar view

By default, you'll be shown your work week.

  • Select the down arrow next to Work week at the top right of your calendar.

    Select down arrow next to Work Week in the top right of page

Day gives you an agenda view focused on one day at a time.

Work week shows you Monday through Friday.

Week shows you the entire week.

View different dates

In the top left corner you'll find the month and year.

Change month and year in top left of page

  • To change your calendar view to any date—past or future—select the month.

  • To scroll by day or week (depending on your calendar view), select the right and left arrows next to the month.

  • Select Today to return to the current date.

Note: The calendar shows you everything that was scheduled in Teams, Exchange, and Outlook.

There are a couple of different ways to get an impromptu meeting going with just a few clicks.

From your calendar

  1. Go to Calendar Meetings button on the left side of Teams, then select Meet now Meet now button in the upper right corner.

  2. You'll have a chance to set a few things up before you start your meeting. Give it a title, choose whether you want to use video, and pick your preferred audio source.

  3. When you're ready, hit Join now.

Your meeting is now up and running—you just need people to join you.

To invite people:

  1. Start typing the name or phone number of someone you want to invite in the box under People in the top right. Select them when they appear in the list, and they'll get a call right away.

  2. Another option is to copy the meeting link and send it to anyone you want to meet with, and they can join by selecting it. Just choose Copy join info and paste the link in a message.

If you don't have meeting scheduling capability in Outlook or Teams, starting an instant meeting is a great option. Just like with scheduled meetings, everyone who attends your meeting will continue to have access to the meeting chat, the recording, and anything else people share in the meeting (like files and meeting notes), even after the meeting ends.

To rejoin the same meeting anytime, find the meeting chat in your chat list and select Join.

In a channel

To start an instant channel meeting:

  1. Go to Teams Teams button on the left side of the app. Choose the channel you want to meet in from the list.

  2. In the Posts tab, look for Meet Meet now button in the top-right corner. From the drop-down, select Meet now. Or, to keep the context of a specific conversation, choose Reply below any post, and then Meet now Meet now button under the box where you'd type your message.

  3. Give your meeting a title and choose whether you want to include video.

  4. When you're ready, hit Join now.

Your meeting is now up and running, and anyone in the channel can join it.

To invite people:

  1. Start typing the name or phone number of someone you want to invite in the box under People in the top right. Select them when they appear in the list, and they'll get a call right away.

  2. You can also invite people by copying the meeting link and sending it to anyone you want to meet with. Just choose Copy join info and paste the link in a message.

  1. After joining the meeting, select People.

  2. In the Participants pane, select More actions > Lock the meeting (or unlock when locked).

    Image showing the Participants dropdown with lock meeting option.

When a meeting is locked, no additional participants can join, but invitees can still access the meeting chat, recording, and other meeting info.

Note: After participants leave the meeting, they cannot join again until the meeting is unlocked.

If you've organized a Teams meeting, you can download a current attendance report during the meeting as well as a final report after the meeting. The report includes the name of each person in the meeting and the time they joined and left.

Notes:

  • Only meeting organizers and co-organizers can view and download attendance reports.

During the meeting

  1. If the participants pane isn’t open, select People teams people icon in your meeting controls.

  2. Click More actions, then select the Download attendance list to download the current attendance info as a .CSV file that you can open in Excel.

Image showing the participants dropdown with "download attendance list" called out.


Look for the file in your device's Downloads folder.

After the meeting

You'll find the attendance report in a few different places.

In the meeting invite

In Teams, go to Calendar Calendar icon, open the meeting, and select the Attendance tab. You can view the data directly in Teams.

Image displaying the meeting invite screen with the "attendance" tab called out at the top.

For recurring meetings, select the report you want to view from the dropdown list.

Image showing the Attendance weekly report window with report drop down menu expanded.

Notes:

  • In channel meetings, the attendance report is available only for the most recent meeting from the channel, but you can go to the meeting invite page in Teams calendar for all channel meeting attendance reports.

To download the attendance .CSV file for the meeting, click Download:

Image displaying the meeting invite with "download" button highlighted in the upper right corner.

Note: If you set up breakout rooms in your meetings, the attendance information will be shown in main meeting’s attendance reports.

In the meeting chat

A tile labeled Attendance report will pop into the chat about five minutes after your meeting ends. Select it to download the .CSV file.

Note: For recurring meetings, you'll receive a unique attendance report after each occurrence.

You can also view attendance information in the Attendance tab in the meeting or webinar chats:

Image showing the attendance tab at the top of the meeting invite.

Scheduled channel meetings

To view the attendance reports for meetings created in channels, click the three dots icon > View meeting details then navigate to the Attendance tab.

Image showing the "View meeting details" flyout.

Image showing the "Attendance" tab highlighted in the top navigation menu bar.

Known issues and limitations

  • In meetings with more than 120 participants, the attendance report that's available during the meeting will only include a partial list of attendees. The post-meeting report will contain the full list.

  • The report does not include insights from deleted breakout rooms.

  • The report does not currently include view-only attendees.

  • If a channel meeting is in progress and someone starts a second meeting within the same channel conversation, an attendance report will be available only for the second meeting. You can go to the Attendance tab in the Teams calendar invite for all channel meeting attendance reports.

  • If someone waits in the lobby and doesn't get admitted to the meeting, they won't be included in the report.

  • When a participant is on hold in a meeting, their info is still included for this period of time in attendance report.

Meeting organizers have the option to end the meeting for all participants. If you're a teacher, for example, this is a great way to make sure your students don't hang around in your virtual classroom after you've left.

  • In your meeting controls, select the down arrow next to Leave and then End meeting.

You'll be asked to confirm. When you do, the meeting will end for everyone right away.

Any Teams meeting or call can be recorded for future viewing. The recording captures audio, video, and screen sharing activity, and you can share it securely across your organization.

A recording will expire and be automatically deleted after a set period of time. The length of time it's available is set by your admin, but you can change the expiration date of any given recording. For more info, see Manage the expiration of a meeting recording.

Notes:

  • Meeting recordings won't capture whiteboards, annotations, shared notes, and also won't include videos or animations embedded in PowerPoint Live presentations.

  • When you view a meeting recording, you'll see no more than four peoples' video streams at once.

In this article

Start recording

When you start recording a meeting, you also turn on live transcriptions (if your IT admin allows transcriptions).

  1. Start or join the meeting.

  2. Go to the meeting controls and select More actions More options button > Start recording.

    Image shows how to start a recording in a Teams meeting.

    Everyone in the meeting gets notified that recording and transcription have started.

    Image showing the full notification you see once you start recording a Teams meeting.

    Notes:

    • You can't make multiple recordings of the same meeting at the same time. If one person starts recording a meeting, that recording will be stored on the cloud and available to all participants.

    • Meeting participants have the option of viewing the transcription during the meeting. For details, see view live transcription.

Stop recording

  1. Go to the meeting controls and select More actions More options button.

  2. Choose one of the following:

    • Stop recording: Stops the recording and live transcription.

    • Stop transcription: Stops just the live transcription. The recording continues until you select Stop recording.

Find recordings

Recordings are available in different places depending on the type of meeting.

  • The recording is processed and saved to SharePoint if it was a channel meeting or OneDrive if it was any other type of meeting.

  • The meeting recording shows up in the meeting chat or channel conversation (if you’re meeting in a channel).

Note: For now, guests and external attendees can view the recording only if it's explicitly shared with them.

Who can start or stop a recording?

Anyone who meets the following criteria can start or stop a recording, even if the meeting organizer isn't present, as long as the meeting organizer has their cloud recording policy setting turned on.

  • Has one of the following licenses: Office 365 Enterprise E1, E3, E5, F3, A1, A3, A5, M365 Business, Business Premium, or Business Essentials.

  • Has recording enabled by an IT admin.

  • Isn't a guest or from another organization.

Type of user

Can start recording?

Can stop recording?

Meeting organizer

  • Yes

  • Yes

Person from same org

  • Yes

  • Yes

Person from another org or company

  • No

  • No

Guest

  • No

  • No

Anonymous

  • No

  • No

Notes:

  • Recording continues even if the person who started the recording has left the meeting.

  • The recording stops automatically once everyone leaves the meeting. If someone forgets to leave, the recording automatically ends after four hours.

  • If one of the participants has a policy for compliance recording, the meeting will be recorded according to the policy even if that participant is from another org.

With Teams Premium, meeting organizers can easily manage who can record when scheduling Teams meetings. There are two options for who can record a meeting: organizers and co-organizers, or organizers and presenters.

See Roles in a Teams meeting for details about selecting presenters and changing someone's role before and during a meeting.

Note: Teams Premium is an add-on license that provides additional features to make Teams meetings more personalized, intelligent, and secure. To get access to this license, contact your IT admin.

  1. Go to Calendar on the left side of the app and select New meeting in the top right corner.

  2. Invite people to the meeting.

  3. In the meeting invitation, select Meeting options.

  4. Set meeting participants as presenters and co-organizers, as necessary.

  5. Next to Who can record, select an option from the dropdown menu.

6. Select Save and then send the meeting invite.

Manage the expiration of a meeting recording

Your admin's settings determine whether (and when) a recording will expire. If your recording has an expiration date, you'll see a message indicating that when the recording pops into the meeting chat after the meeting ends.

Image showing "recording is about to expire" message.

Open the details pane to view or change the expiration date.

There are a couple of different ways to get there:

  1. Click on the recording to open it in your browser. Once the browser page has opened, select Info icon in the upper right to open the details pane.

  2. Or, go to My files in your OneDrive or SharePoint site and view as a list. Mouse over the recording in question, select Show actions (the three vertical dots to the right of the file name), and then choose Details.

When the details pane is open, look for Expiration date. Here's where you'll see the date that's currently set.

Details pane showing recording expiration date

Open the drop-down to see your options for changing the date. Extend the recording's availability for a certain number of days, or pick a specific date on the calendar. You can also choose No expiration if you don't want it to be deleted.

Drop-down menu for recording expiration date

Notes:

  • The message indicating that your recording will expire will persist on the recording in the chat even if you remove the expiration date. But don't worry—if you've selected No expiration, it won't expire.

  • The owner of the recording will get an email when it expires. At that point, they'll have up to 90 days to recover it from the recycle bin. Once recovered, the recording will no longer expire automatically.

  • Watching the recording won't affect the expiration date.

Privacy

When a meeting recording starts, Teams shows a notification to all participants on the Teams desktop, web, and mobile apps, as well as to people who joined via phone.

In some places, you legally need to get everyone's permission before you can record them. Make sure you know the rules before you start.

For more information, see the Microsoft Privacy Statement.

Troubleshoot recordings

If you're having problems recording a meeting, you'll probably need the help of an IT admin to work through them. Keep these things in mind as you move forward:

  • An IT admin must provide a recording license to both the meeting organizer and the recorder.

  • Guests or federated users can't record meetings or calls.

In this article

Play a meeting recording

The recording will be available after the meeting was scheduled to end (so not necessarily when it actually ends).

If you were part of a scheduled meeting, go the Details tab of the meeting event in your calendar and select the recording.

If it was a channel meeting, go to the channel conversation and select the recording.

You can also select More actions More options button on the meeting recording and choose Open in OneDrive if it was a chat meeting, or Open in SharePoint if it was a channel meeting.

Meeting recording storage and permissions

Teams meeting recordings will be stored in OneDrive or SharePoint, depending on the type of meeting.

Note that a recording will expire and be automatically deleted after a set period of time. The amount of time it's available is set by your admin, but you can change or remove the expiration date of any given recording. For more info, see Record a meeting in Teams.

Channel meetings

For channel meetings, the recording will be stored in a Recordings folder in the Files tab for the channel.

The Files tab stores all files in a SharePoint site and document library for the channel. Everyone who is a part of the channel will have permission to edit and view the recording.

All other meetings

For non-channel meetings, the recording will be stored in the Recordings folder in the OneDrive directory of the person who started the recording.

Note: Only the organizer of the meeting and the person who started the recording will be able to edit the recording. But everyone invited to the meeting will be able to view the recording.

Share a link to a meeting recording with others

If you recorded or organized the meeting, you can share the recording with people who weren't invited to the meeting—by just sharing it like you would share any other file.

Just find the file in OneDrive or SharePoint and share it directly with people or copy a link and share it however you like.

If you weren't the person who recorded or organized the meeting, you can still share the recording with people weren't invited to the meeting. However, the meeting organizer or the the meeting recorder will need to approve your share action before other people will get access.

Download a meeting recording

Only the person who started the recording and the meeting organizer can download the recording. Go here to learn more about downloading files or folders from OneDrive or SharePoint.

Recording owners (either the person who started the recording, or any additional owners named by that person) are the only people who can delete recordings.

You can delete specific files or photos on Microsoft OneDrive, or you can delete entire folders and all the items in them. If you need to, you might be able to restore deleted files from the OneDrive recycle bin.

  1. Go to the OneDrive website. You might need to sign in with your Microsoft account, or your work or school account.

  2. Select the files or folders you want to delete by pointing to each item and clicking the circle check box that appears. (The left image below shows items in List view, the right image shows items in Tiles or Photos view.)

    Screenshot of selecting a file in OneDrive in tile view

  3. To select all files in a folder, click the circle to the left of the header row, or press CTRL + A on your keyboard. (You can also select several files at once by selecting one file, scrolling down the list, then hold down the Shift key while left-clicking the last item you want to select.)

  4. On the bar at the top of the page, select Delete. (You can also right-click the selected file or folder and select Delete.)

    Note: If you do not see the Delete icon in the top navigation bar, or when you right-click a selected item, you may not have permission to delete that file or folder.

  5. To delete a folder, rather than just its contents, you may need to go up or back a level to select the whole folder.

    Selecting a OneDrive folder

    Selecting a OneDrive folder

    Notes:

    • A personal OneDrive folder does not need to be empty before you delete it. However, you may want to check beforehand that there are no files or sub-folders within it that you want to keep.

    • With OneDrive for work or school accounts, a folder must be empty before you can delete it, if your admin has enabled retention in OneDrive for work or school accounts.

Empty your recycle bin

Your deleted files and folders go to the OneDrive recycle bin from which you can restore files if you need to.

First, select Recycle bin in the OneDrive left side navigation.

A screenshot showing the Recycle Bin tab in OneDrive.com.

  • To permanently delete specific files or folders from the recycle bin, select those items, then select Delete in the top navigation.

  • To permanently delete the entire recycle bin at once, select Empty recycle bin in the top navigation.

Note: Once you delete files from the OneDrive recycle bin, there may be a short delay in seeing that reflected in your OneDrive account's storage availability.

Haven't found the answer? We can help.

Submit a request

Contact us and we’ll get back to you as soon as possible.

...