Microsoft 365 Guideline

Updated 09 January 2023

Email / Exchange / Outlook


Frequently asked questions

Exchange is a mail server, which means it's a dedicated network resource management program. Outlook is an email client, which means it's a software program installed on your desktop that is designed to send and receive emails.

These steps are the same whether you're adding your first email account or additional email accounts to Outlook.

  1. 1.Select File > Add Account.
  2. 2.What you see next depends on your version of Outlook.
    For Outlook for Microsoft 365 and Outlook 2016

    Enter your email address and click Connect.

    For Outlook 2013 and Outlook 2010

    Enter your name, email address, and password, and click Next.
  3. 3.If prompted, enter your password again, then select OK > Finish to start using your email account in Outlook.
Outlook for Microsoft 365 Outlook 2021 Outlook 2019 Outlook 2016 Outlook 2013

To find the size of your mailbox, in the Mail view, click your account.


Click Folder > Folder Properties.


Click Folder Size at the bottom of the pane.


You’ll see that the size for the mailbox and each subfolder is indicated in kilobytes (KB).

To find the size in megabytes, move the decimal point over three places to the left. For example, 4742 KB is roughly 4.7 MB. For the exact figure, divide the KB value by 1024.

Outlook for Microsoft 365 Outlook 2021 Outlook 2019 Outlook 2016 Outlook 2013

Mailbox Cleanup

In Outlook, choose File > Info > Cleanup Tools > Mailbox Cleanup.


  1. 1.Choose the View Mailbox Size option, which scans the size of your mailbox and all of the subfolders. This is a great way to target which folders are the biggest contributors to your large mailbox so you can clean these up first.
  2. 2.Pick the options to Find older or larger items that you can delete directly from the results to clean up the Outlook mailbox size.
    One limitation that may encounter when migrating to Exchange Online is the "Message Size Limit" of 35 MB. mailboxes may contain messages that exceed 35 MB will cause issues during migration.
    The messages can't be migrated to Exchange Online, so there are a few options:
    -Export the large messages to a format such as .MSG, .EML or PST and archive them
    -Delete/archive just the large attachment from the message and migrate the remaining message body
  3. 3.Check the size of the Deleted Items folder and Empty the folder

Create and send email

  1. Choose New Email to start a new message.

  2. Enter a name or email address in the To, Cc, or Bcc field.

  3. In Subject, type the subject of the email message.

  4. Place the cursor in the body of the email message, and then start typing.

  5. After typing your message, choose Send.

New Message in Outlook

Use @mentions to get someone's attention

  1. In the body of the email message or calendar invite, enter the @ symbol and the first few letters of the contact's first or last name.

  2. When Outlook offers you one or more suggestions, choose the contact you want to mention.

    By default, their full name is included. You can delete a portion of the mention, for example, everything other than the person's first name.

  3. The mentioned contact is added to the To line of the email or the meeting invite.

At Mention in Outlook

Focused Inbox

Focused Inbox helps you focus on the emails that matter most. It separates your inbox into two tabs—Focused and Other.

If messages aren't sorted the way you like, you can move them and set where to deliver future messages from that sender.

  1. Select the Focused or Other tab.

  2. Right-click the message you want to move and select Move to Other or Move to Focused.

To turn the Focused Inbox on or off:

  • Select View > Show Focused Inbox.

Focused Inbox in Outlook

Schedule an appointment

  1. In Calendar, select New Appointment.

  2. Add a Subject, Location, and the start and end times.

  3. Select Invite Attendees to turn the appointment into a meeting.

  4. Select Save & Close to finish, or Send if it's a meeting.

Outlook New Appointment

Use the Scheduling Assistant

When you create a meeting, use the Scheduling Assistant to see when attendees and rooms are available.

  • From a new meeting request, select Scheduling Assistant.

  • The shaded area with vertical bars shows the meeting time. Drag the bars to adjust the meeting time.

  • The grid shows when attendees are available. To the right of the meeting request, Outlook shows suggested times and the number of conflicts.

Outlook Scheduling Assistant

Add a contact

  1. Select the People icon.

  2. Select New Contact or press Ctrl+N.

  3. Enter a name and any other information that you want to include for the contact.

  4. Select Save & New to create another contact, or Save & Close if you're done.

Outlook New Contact

Share a file to collaborate on attachments

  1. Select Attach File and choose a file.

  2. If the file has a small cloud icon, it's already saved to the cloud, which lets you share and work on it with others.

    If it doesn't, click the drop-down arrow, hover on Upload, and then select OneDrive.

  3. Type a message and select Send.

Share items in Outlook

Set up an online meeting and shared notes

In the left pane, select the Calendar icon.

To set up a meeting attendees can join remotely, select New Teams Meeting. This inserts a link remote attendees can use to join the meeting.

To set up a shared space for notes, select Meeting Notes. You can create a new OneNote notebook, or select an existing notebook. A link to the notebook appears in the meeting request.

Outlook Team Meeting Outlook Meeting Notes

In Outlook, you can create one or more personalized signatures for your email messages. Your signature can include text, images, your electronic business card, a logo, or even an image of your handwritten signature. You can set up Outlook so that signatures are automatically added to all outgoing messages or create your signature and add it to messages on a case-by-case basis.

Create your signature and choose when Outlook adds a signature to your messages

Important: If you have a Microsoft account, and you use Outlook and Outlook on the web or Outlook on the web for business, you need to create a signature in both products.

  1. Open a new email message.

  2. On the Message menu, select Signature > Signatures.

    Depending on the size of your Outlook window and whether you're composing a new email message or a reply or forward, the Message menu and the Signature button might be in two different locations.

    Select Signature from the Message menu.

    Select Signature with a reply or forward in the reading pane.

  3. Under Select signature to edit, choose New, and in the New Signature dialog box, type a name for the signature.

  4. Under Edit signature, compose your signature. You can change fonts, font colors, and sizes, as well as text alignment. If you want to create a more robust signature with bullets, tables, or borders, use Word to format your text, then copy and paste the signature into the Edit signature box. You can also use one of our pre-designed templates for your signature. Download the templates in Word, customize them with your personal information, and then copy and paste them into the Edit signature box.

    Type a new signature to use in your email

    Notes:

    • You can add links and images to your email signature, change fonts and colors, and justify the text using the mini formatting bar under Edit signature.

    • You can also add social media icons and links in your signature or customize one of our pre-designed temlates.

  5. Under Choose default signature, set the following options for your signature:

    In the E-mail account drop-down box, choose an email account to associate with the signature. You can have different signatures for each email account.

    If you want your signature added to all new messages by default, in the New messages drop-down box, select one of your signatures. If you don't want to automatically add a signature to new messages, choose (none). This doesn't add a signature to any messages you reply to or forward.

    If you want your signature to appear in the messages you reply to and forward, in the Replies/forwards drop-down, select one of your signatures. Otherwise, accept the default option of (none).

    Type a new signature to use in your email

  6. Choose OK to save your new signature and return to your message. Outlook doesn't add your new signature to the message you opened in Step 1, even if you chose to apply the signature to all new messages. You'll have to add the signature manually to this one message. All future messages will have the signature added automatically. To add the signature manually, select Signature from the Message menu and then pick the signature you just created.

Insert a signature manually

If you don't choose to insert a signature for all new messages or replies and forwards, you can still insert a signature manually.

  1. In your email message, on the Message tab, select Signature.

  2. Choose your signature from the fly-out menu that appears. If you have more than one signature, you can select any of the signatures you've created.

Create an email signature that you can add automatically to all outgoing messages or add manually to specific ones.

Create an email signature

  1. Sign in to Outlook.com and select SettingsSettings> View all Outlook settings at the top of the page.

  2. Select Mail >Compose and reply.

  3. Under Email signature, type your signature and use the available formatting options to change its appearance.

    Note: You can have only one signature per account.

    • If you want your signature to appear at the bottom of all new email messages that you compose, select the Automatically include my signature on new messages I compose check box.

    • If you want your signature to appear on messages that you forward or reply to, select the Automatically include my signature on messages I forward or reply to check box.

    • If you don’t select these options, you can manually add your signature to a selected message. For details, see Manually add your signature to a new message.

  4. Select Save when you're done.

    Note: You can always return to the Compose and reply page and select or clear the check box for automatically including your signature.

Manually add your signature to a new message

If you've created a signature, but didn't choose to automatically add it to all outgoing messages, you can add it later when you write an email message.

  1. Go to your mailbox and choose New message.

  2. Type your message, and then choose More actions > Insert signature at the bottom of the compose pane.

  3. When your email message is ready, choose Send.

  1. Under Edit signature, add the text "C : Chat with me on Teams" above your office telephone.
    Share

  2. Select the text "Chat with me on Teams" and press the Share icon to add the hyperlink.

  3. Under "Edit Hyperlink" screen, add this link "https://teams.microsoft.com/l/chat/0/0?users=" in Address field. You must replace the "" part with your actual Office 365 address that you use with Teams.
    > Share

Microsoft 365 subscribers can set up automatic replies for when they are out-of-office or unavailable to respond to email.

  1. Select File > Automatic Replies.

    Note: If you don't see the Automatic Replies button, follow the steps to use rules to send an out of office message.

  2. Select Send automatic replies.

  3. If you don't want the messages to go out right away, select Only send during this time range.

  4. Choose the dates and times you'd like to set your automatic reply for.

  5. Type in a message. You can format the text using the tool bar, or cut and paste text you've formatted, including hyperlinked text.

  6. Select OK.

Notes:

  • To set an automatic reply for contacts outside your company, select Outside My Organization > Auto-reply to people outside my organization, type in a message, and select OK.

Create an automatic reply

  1. Select Settings > View all Outlook settings.

  2. Select Automatic replies.

  3. Turn on automatic replies.

  4. If you want, choose to:

    • Set a start and end date

    • Block my calendar for this period

    • Automatically decline new invitations for events that occur during this period

    • Decline and cancel my meetings during this period

  5. Type your message.

  6. Choose if you want to send a response to people outside your organization. If so, type another message.

  7. Select Save.

Use a contact group (formerly called a “distribution list”) to send an email to multiple people—a project team, a committee, or even just a group of friends—without having to add each name to the To, Cc, or Bcc line individually.

  1. On the Navigation bar, click People.

    Note: You can find People in one of two places on the Navigation bar.

    If you're using the compact Navigation bar, click the People icon.

    Select the People icon to see your contacts.

    If you're using the expanded Navigation bar, click the word People.

    Select People to view your contacts.
  2. Under My Contacts, select the folder where you want to save the contact group. Usually, you'll select Contacts.

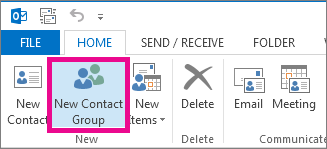
  3. On the Ribbon, select New Contact Group.

  4. Give your contact group a name.

  5. Click Add Members, and then add people from your address book or contacts list.

    Add members to a new group

    Note: To add someone who is not in your address book or contacts, select New E-mail Contact.

  6. Click Save & Close.

    To learn how to use your new contact group, see topic : Send an email message to a contact group.

Use an email to create a contact group

If you’re always emailing the same group of people, you can create a contact group (previously called a distribution list) that includes all of the recipients by using a previous email that you sent to them. Then, the next time you want to contact them or schedule a meeting with them, you can add the contact group to the To line of your message, instead of adding each person individually.

  1. Open an email that was sent to the people you want to include in the contact group.

  2. In the To or Cc box, highlight all the names with your mouse.
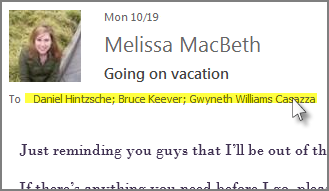
    Select the people in the email message

  3. Right-click your selection, and then click Copy, or press Ctrl+C.

  4. In the main Outlook window (not in the opened email message), click People on the Navigation bar.

    Click People

  5. Click New Contact Group.

    Click New Contact Group on the Home tab

  6. Type a name for your contact group, like Special Projects.

  7. Click Add Members > From Outlook Contacts.
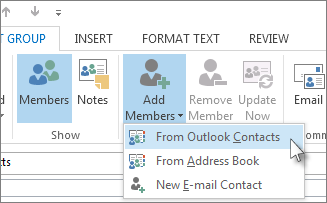
    Add New Members from Outlook Contacts

  8. In the window that opens, right-click inside the Members box, and click Paste, or press Ctrl+V.

  9. Click OK.

    The people from the email will appear as a list of members for your contact group.
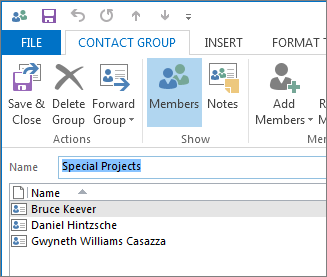
    Your new contact group should now contain people

  10. Click Save & Close.

Contact groups show up in your list of contacts, along with individual people. You can tell the difference by the icons that appear to the left of the names in List view. The card icon is for individual contacts and the people icon is for contact groups.
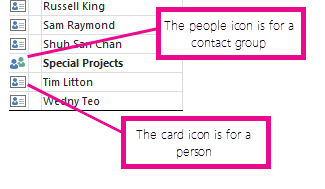
People icons are for contact groups, and card icons are for individuals

Finally, you can always add people or remove people from the contact group later.

A contact group (formerly called a "distribution list") is a collection of email addresses. You can use a contact group to send an email message or meeting invitation to all the addresses at once. You can include contact groups in messages, task requests, meeting requests, and in other contact groups.

Send a message or a meeting invite to a contact group

  1. Open Outlook and create a new email message or meeting request.

  2. If you know the name of your contact group, you can type it in the To field directly. Outlook will show you potential matches from the address book.

    You can also click the To button to display the Select Names dialog. Type a few characters of the contact group name and click Go. Contact groups are shown in bold font.

    You can select a contact group when sending your message.

  3. Enter a message or meeting subject, fill out any other necessary information, such as start and end times for a meeting, then click Send.

Haven't found the answer? We can help.

Submit a request

Contact us and we’ll get back to you as soon as possible.

...