Microsoft 365 Guideline

Updated 09 January 2023

Set up multifactor authentication (MFA) for Microsoft 365

Compromised passwords are one of the most common ways that bad guys can get at your data, your identity, or your money. Using multifactor authentication is one of the easiest ways to make it a lot harder for them.

Set up your mobile device to use a text message as your verification method

  1. On the Additional security verification page, select Authentication phone from the Step 1: How should we contact you area, select your country or region from the drop-down list, and then type your mobile device phone number.

  2. Select Send me a code by text message from the Method area, and then select Next.

    Additional security verification page, with authentication phone and text message

  3. Type the verification code from the text message sent from Microsoft into the Step 2: We've sent a text message to your phone area, and then select Verify.

  4. Select Done.


Frequently asked questions

When you sign into your online accounts - a process we call "authentication" - you're proving to the service that you are who you say you are. Traditionally that's been done with a username and a password. Unfortunately, that's not a very good way to do it. Usernames are often easy to discover; sometimes they're just your email address. Since passwords can be hard to remember, people tend to pick simple ones, or use the same password at many different sites.

That's why almost all online services - banks, social media, shopping and yes, Microsoft 365 too - have added a way for your accounts to be more secure. You may hear it called "Two-Step Verification" or "Multifactor Authentication" but the good ones all operate off the same principle. When you sign into the account for the first time on a new device or app (like a web browser) you need more than just the username and password. You need a second thing - what we call a second "factor" - to prove who you are.

A factor in authentication is a way of confirming your identity when you try to sign in. For example, a password is one kind of factor, it's a thing you know. The three most common kinds of factors are:

  • Something you know - Like a password, or a memorized PIN.

  • Something you have - Like a smartphone, or a secure USB key.

  • Something you are - Like a fingerprint, or facial recognition.

Let's say you're going to sign into your work or school account, and you enter your username and password. If that's all you need then anybody who knows your username and password can sign in as you from anywhere in the world!

But if you have multifactor authentication enabled, things get more interesting. The first time you sign in on a device or app you enter your username and password as usual, then you get prompted to enter your second factor to verify your identity.
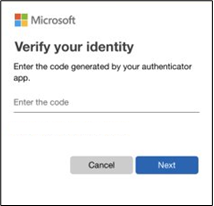
2984712 2.4 4 authenticator

Perhaps you're using the free Microsoft Authenticator app as your second factor. You open the app on your smartphone, it shows you a unique, dynamically created 6-digit number that you type into the site and you're in.
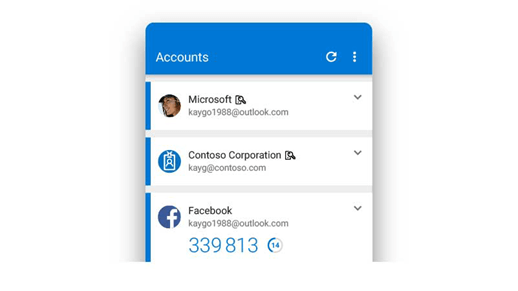
Microsoft Authenticator shows a frequently changing 6 digit code to verify sign-in

If somebody else tries to sign in as you, however, they'll enter your username and password, and when they get prompted for that second factor they're stuck! Unless they have YOUR smartphone, they have no way of getting that 6-digit number to enter. And the 6-digit number in Microsoft Authenticator changes every 30 seconds, so even if they knew the number you used to sign in yesterday, they're still locked out.

Get the free Microsoft Authenticator app

Microsoft Authenticator can be used not only for your Microsoft, work, or school accounts, you can also use it to secure your Facebook, Twitter, Google, Amazon, and many other kinds of accounts. It's free on iOS or Android.

Some people worry that multifactor authentication is going to be really inconvenient, but generally it's only used the first time you sign into an app or device, or the first time you sign in after changing your password. After that you'll just need your primary factor, usually a password, like you do now.

The extra security comes from the fact that somebody trying to break into your account is probably not using your device, so they'll need to have that second factor to get in.

Among those sharing account, please choose one user in the group to set up MFA.
(Note that each users will have to acquire verification code to log in )

You can set up an authenticator app to send a notification to your mobile device or to send you a verification code as your security verification method. You are required to use the Microsoft Authenticator app.

Important: Before you can add your account, you must download and install the Microsoft Authenticator app. If you haven't done that yet, go Google Android or Apple iOS. On your device, go to Google Play or App Store to download and install the Authenticator app.

Set up the Microsoft Authenticator app to send notifications

  1. On the Additional security verification page, select Mobile app from the Step 1: How should we contact you area.

  2. Select Receive notifications for verification from the How do you want to use the mobile app area, and then select Set up.

    Screenshot that shows the "Additional security verification" page, with "Mobile app" and "Receive notifications for verification" selected.

    The Configure mobile app page appears.

    Screen that provides the QR code

  3. Open the Microsoft Authenticator app, select Add account from the Customize and control icon in the upper-right, and then select Work or school account.

    Note: If you receive a prompt asking whether to allow the app to access your camera (iOS) or to allow the app to take pictures and record video (Android). select Allow so the authenticator app can access your camera to take a picture of the QR code in the next step.

  4. Use your device's camera to scan the QR code from the Configure mobile app screen on your computer, and then choose Next.

  5. Return to your computer and the Additional security verification page, make sure you get the message that says your configuration was successful, and then select Next. The authenticator app will send a notification to your mobile device as a test.

    Screenshot that shows the "Additional security verification" page, with the "Mobile app has been configured..." success message highlighted.

  6. On your mobile device, select Approve.

  7. On your computer, add your mobile device phone number to the Step 3: In case you lose access to the mobile app area, and then select Next. Microsoft recommends adding your mobile device phone number to act as a backup if you're unable to access or use the mobile app for any reason.

  8. From the Step 4: Keep using your existing applications area, copy the provided app password and paste it somewhere safe.

    App passwords area of the Additional security verification page

  9. Select Done.

Set up the Microsoft Authenticator app to use verification codes

  1. On the Additional security verification page, select Mobile app from Step 1: How should we contact you?.

  2. Select Use verification code from the How do you want to use the mobile app area, and then select Set up.

    Additional security verification page, with mobile app and notifications option

    The Configure mobile app page appears.

    Screen that provides the QR code

  3. Open the Microsoft Authenticator app, select Add account from the Customize and control icon in the upper-right, and then select Work or school account.

    Note: If you receive a prompt asking whether to allow the app to access your camera (iOS) or to allow the app to take pictures and record video (Android). select Allow so the authenticator app can access your camera to take a picture of the QR code in the next step.

  4. Use your device's camera to scan the QR code from the Configure mobile app screen on your computer, and then choose Next.

  5. Return to your computer and the Additional security verification page, make sure you get the message that says your configuration was successful, and then select Next. The authenticator app asks for a verification code as a test.

    Additional security verification page, with success message

  6. From the Microsoft Authenticator app, scroll down to your work or school account, copy and paste the 6-digit code from the app into the Step 2: Enter the verification code from the mobile app box on your computer, and then select Verify.

    Additional security verification page, with verification code test

  7. On your computer, add your mobile device phone number to the Step 3: In case you lose access to the mobile app area, and then select Next. Microsoft recommends adding your mobile device phone number to act as a backup if you're unable to access or use the mobile app for any reason.

  8. From the Step 4: Keep using your existing applications area, copy the provided app password and paste it somewhere safe.

    App passwords area of the Additional security verification page

    Note: For information about how to use the app password with your older apps, see Manage app passwords. You only need to use app passwords if you're continuing to use older apps that don't support two-factor verification.

  9. Select Done.

It happens. You left your mobile device at home, and now you can't use your phone to verify who you are. Maybe you previously added an alternative method to sign in to your account, such as through your office phone. If so, you can use this alternative method now. If you never added an alternative verification method, you can contact your organization's Help desk for assistance.

  1. Sign in to your account but select the Sign in another way link on the Two-factor verification page.

    Change sign in verification method

  2. If you don't see the Sign in another way link, it means that you haven't set up any other verification methods. You'll have to contact your administrator for help signing into your account.

  3. Choose your alternative verification method, and continue with the two-step verification process.

If you've lost or had your mobile device stolen, you can take either of the following actions:

  • Sign in using a different method.

  • Ask your M365 Team's help to clear your settings.

The Help desk can make the appropriate updates to your account. After your settings are cleared, you'll be prompted to register for two-factor verification the next time you sign in.

Azure MFA detects unusual activity like repeated sign-in attempts, and may prevent additional attempts to counter security threats. If you've mistakenly made many sign-in attempts, wait until you can try again, or use a different MFA method for sign-in. If you suspect someone else is trying to access your account, contact your administrator. The error could be caused by malicious activity, misconfigured MFA settings, or other factors.

Not receiving your verification code is a common problem. The problem is typically related to your mobile device and its settings. Here are some suggestions that you can try.

  • Use the Microsoft authenticator app or Verification codes

  • Restart your mobile device

  • Verify that your security information is correct

  • Verify that your notifications are turned on

  • Make sure you have a device signal and Internet connection

  • Turn off Do not disturb

You sign in to your work or school account by using your user name and password. Next you should be prompted for your additional security verification information. If you are not prompted, maybe you haven't yet set up your device. Your mobile device must be set up to work with your specific additional security verification method.

Maybe you haven't set up your device yet. Your mobile device has to be set up to work with your specific additional security verification method. For the steps to make your mobile device available to use with your verification method, see Manage your two-factor verification method settings. If you know that you haven't set up your device or your account yet, you can follow the steps in the Set up my account for two-step verification article.

If you have a new phone number, you'll need to update your security verification method details. This enables your verification prompts to go to the right location.

You can add new phone numbers, or update existing numbers, from the Additional security verification page.

Important: Microsoft strongly recommends that you add a secondary phone number to help prevent being locked out of your account if your primary phone is lost or stolen, or if you get a new phone and no longer have your original, primary phone number.

To change your phone numbers

  1. From the How would you like to respond? section of the Additional security verification page, update the phone number information for your Authentication phone (your primary mobile device) and your Office phone.

  2. Select the box next to the Alternate authentication phone option, and then type in a secondary phone number where you can receive phone calls if you can't access your primary device.

  3. Select Save.

If you have a new mobile device, you'll need to set it up to work with two-factor verification. This is a multi-step solution:

  1. Set up your device to work with your account by following the steps in the Set up my account for two-step verification article.

  2. Update your account and device information in the Additional security verification page. Perform the update by deleting your old device and adding your new one.

Optional steps:

  1. Install the Microsoft Authenticator app on your mobile device

  2. Turn on two-factor verification for your trusted devices

You might find it more difficult to use a mobile device-related verification method, like a text messaging, while you're in an international location. It's also possible that your mobile device can cause you to incur roaming charges. For this situation, we recommend you use the Microsoft Authenticator app, with the option to connect to a Wi-Fi hot spot.

No additional charges will be applied.

Haven't found the answer? We can help.

Submit a request

Contact us and we’ll get back to you as soon as possible.

...