Microsoft 365 Guideline

Updated 09 January 2023

One Drive


Frequently asked questions

Use OneDrive in your browser

  1. Sign in to office.com.

  2. Select the app launcher icon App Launcher, and then select OneDrive.

  3. Pick a file or folder by selecting the circle in the upper corner of the item, and then select a command at the top of the page.

A browser window with the app launcher open and the OneDrive app highlighted

Upload files or folders to OneDrive

You can store over 300 types of files on OneDrive. With Microsoft Edge or Google Chrome:

  1. Select Upload > Files or Upload > Folder.

  2. Select the files or folder you want to upload.

  3. Select Open or Select Folder.

With other browsers:

  • Select Upload, select the files you want to upload, and select Open.

  • If you don't see Upload > Folder, create a folder, and then upload the files to that folder.

Screenshot showing Upload selected

Note: If you have the OneDrive sync app installed, you can also upload with File Explorer. Select the files you want to upload, and drag them to OneDrive in the File Explorer Navigation pane.

Save a file to OneDrive

  1. Select File > Save a Copy > OneDrive - Personal.

  2. Select Enter file name here and type a name.

  3. If you want to save to another folder, select Browse, and select the folder you want.

  4. Select Save.

The next time you open the Office app, you'll see your saved file in the Recent list.

The locations list on the Save a copy page of a Word document.

Note: Requires Microsoft 365, Office 2019, or Office 2016.

If you don't see OneDrive - Personal in the list:

  1. Select Add a Place

  2. Select OneDrive and sign into your Microsoft account.

Screenshot of the Add a Place button and Add a Place list on the Save As page of Word.

Use OneDrive on your desktop

If you use Windows 10, OneDrive may have already asked you to sign in to sync your files.

In File Explorer, select OneDrive – Personal.

If OneDrive isn't setup, search for topic:

  • Sync files with OneDrive in Windows

File Explorer open with OneDrive-Personal selected

Select what to do with a file

  1. In OneDrive, right-click the file.

  2. Select a command.

Screenshot showing the shortcut menu for a selected file

Create a folder

  1. Select New > Folder.

  2. Type a name for the folder.

  3. Select Create.

OneDrive Create Folder

Search for files

Looking for an older file? Search is a powerful tool to find all your online files.

  1. Type a word or phrase in the Search box.

  2. Select a file, or press Enter.

Search in OneDrive for Business

Back up important folders

You can backup important computer files on OneDrive like your Desktop, Documents, and Pictures files.

  1. Open OneDrive settings (select the OneDrive cloud icon in your notification area, and then select the OneDrive Help and Settings icon then Settings.)

  2. Go to the Back up tab.

  3. Select Manage Back up.

Screenshot of the Set up protection of important folders dialog box in OneDrive

Set up the OneDrive sync app in Windows

  1. If you don't have Windows 10, Microsoft 365, or Office 2016, install the new OneDrive sync app for Windows. If you use the latest software, you already have the OneDrive sync app and you can skip to step 2.

  2. Select the Start button, search for OneDrive, and then open it.

  3. When OneDrive Setup starts, enter your Microsoft account, and then select Sign in.

Screenshot of the first screen of OneDrive Setup

Note: If you already had an account signed in to OneDrive and you want to add another account, select the OneDrive cloud icon in the Windows taskbar notification area, select More > Settings. In Settings, select Account, select Add an account, and then sign in.

For more info, search for topic : Sync files with OneDrive in Windows.

Share files or folders

  1. Select the files or folder you'd like to share.

  2. Select Share Share.

  3. Select Anyone with this link can edit this item and set the permissions:

    • Select Allow editing if you want others to be able to edit the file.

    • Uncheck Allow editing if you only want others to be able to view the file.

Screenshot of a selected file and the Share button in OneDrive.

Stop or change sharing

If you are the file owner, or have edit permissions, you can stop or change the sharing permissions.

  1. Select the file or folder you want to stop sharing.

  2. Select Information Information in the upper-right corner to open the Details pane.

  3. Select Manage access and:

    • Select the X next to a link to disable it.

    • Select Can Edit or Can View, and then select Stop Sharing.

    • Select Can Edit or Can View and then select Change to….

Screenshot of the Sharing section of the Details pane for a shared file.

After you upload photos and files to OneDrive, you can sort, rearrange, rename, and move them on the OneDrive website to keep them organized. To see these options, sign in to OneDrive on the web with your personal Microsoft account.

Sort files

Note: As explained later in this article, the following steps don't apply to Photo view, because this web-only view aggregates photos from various folder locations in OneDrive.

  1. In OneDrive on the web, select My files and go to the folder that contains the files or photos you want to sort.

  2. Select a column header, then select the display order you prefer. (For example, select the Name header, then select A to Z or Z to A.)

    • Alternately, select Sort at the upper right of the screen to specify the order your files are displayed in, such as by Name, Modified, or Sharing.

      Note: The Sort option at the upper right is available only if you're signed in with a Microsoft account.

Rename a file or folder

  1. Select the file or folder you want to rename. (In List view, check the circle to the left of the item; in Tiles or Photo view, check the circle in the upper-right corner of the tile.)

  2. Select Rename, and then enter a new name.

Note: OneDrive can sometimes rename items with invalid characters for you.

Move a file or folder to a different location

To move a file or folder on OneDrive.com:

  1. Browse to the file or folder that you want to move.

  2. Select the item you want to move. (In List view, check the circle that appears to the left of the item when you hover the pointer there; in Tiles or Photo view, check the circle in the upper-right corner of the tile when you hover the pointer there.) You can also select multiple items to move them together, as a group.

  3. In the top navigation, select Move to

  4. In the Move to pane, browse to the destination folder, and then select Move.

    If you want to create a new folder in which to store the item, select New folder.

  5. If you need to move files or folders between OneDrive accounts (such as from a Microsoft account to a work or school account), you'll have to sync the files to your PC or Mac and then use File Explorer (for Windows) or Mac Finder to move your files.

    Note: You can't move photos from Photo view because this web-only view aggregates photos from various folder locations in OneDrive. If you want to move the photos you see there, you'll need to find the files in Files view (or in File Explorer or Finder) and then move the files from their actual locations. If you took the photos on a phone, try searching for the "Camera Roll" folder.

    Similarly, you can't move an album to another location, because an album is also an aggregated view of individual files, rather than a folder that's easily moveable as a unit.

Tips:

  • If you're signed in to the OneDrive desktop app on your computer, you can use File Explorer (or Mac Finder) to sort, move, and rename your OneDrive files and folders.

  • You can also use the OneDrive mobile app on your Android, iOS, or Windows device to sort, move, and rename files or folders.

You can download files and folders from Microsoft OneDrive, or from SharePoint in Microsoft 365, SharePoint Server Subscription Edition, or SharePoint Server 2019 to your computer with just a few clicks.

  1. On your OneDrive, SharePoint in Microsoft 365, SharePoint Server Subscription Edition, or SharePoint Server 2019 website, select the files or folders you want to download.

    • To download individual or multiple files, select each item by clicking the circle check box that appears. (The left image below shows items in List view, the right image shows items in Tiles or Photos view.) (You can also select several files at once by selecting one file, scrolling down the list, then hold down the Shift key while left-clicking the last item you want to select.)

      Screenshot of selecting a file in OneDrive in tile view

    • To select all files in a folder, click the circle to the left of the header row, or press CTRL + A on your keyboard.

    • To select a folder, rather than just its contents, you may need to go up or back a level to select the whole folder.

      Selecting a OneDrive folder

      Selecting a OneDrive folder

  2. In the top navigation, select Download. (You can also right-click the file, photo, or folder, and select Download.)

    Screenshot of the selecting OneDrive files and downloading them.

    Notes:

    • The Download button will only appear when files or folders are selected.

    • The Download button may sometimes disappear if you refresh the web page while looking at a folder. To work around this, you can go up one level in the folder directory and come back, or close that tab in your browser and navigate to the folder again.

  3. If your browser prompts you, choose Save or Save As and browse to the location where you want to save the download. (Some browsers just start saving right away to a Downloads folder on your computer.)

    Notes:

    • If you need to free up space on your OneDrive, download your file or folder to a location outside of your OneDrive folders (see below). You can then delete the OneDrive copy of the file or folder to reduce your storage amount.
      File explorer view

    • For more information, search for topic : Delete files or folders in OneDrive.

If you select multiple files or folders and then select Download from Microsoft OneDrive, SharePoint in Microsoft 365, or from SharePoint Server Subscription Edition, your browser will start downloading a .zip file containing all the files and folders you selected. If you're in a folder and you select Download without selecting any files or folders, your browser will begin downloading all contents of the folder.

Notes:

  • You can't download files directly from the Shared view. You will need to open the file and save a copy in the location of your choice.

  • You can't download multiple files or folders from SharePoint Server 2019.

  • You can't download OneNote notebooks. If you download a folder that contains a OneNote notebook, the .zip file will contain an error message in the form of a .txt file.

  • The option to download multiple files is not yet available in on-premises SharePoint Server (when your organization doesn't subscribe to an Microsoft 365 business plan).

  • The Download button may sometimes disappear if you refresh the web page while looking at a folder. To work around this, you can go up one level in the folder directory and come back, or close that tab in your browser and navigate to the folder again.

  • In OneDrive for work or school, you can't use Internet Explorer to download folders or multiple files. You can use Microsoft Edge or Google Chrome to download folders or multiple files.

  • Downloads are subject to the following limits: 250GB file size limit; total number of files limit: 10,000; folder size limit: 10000 files.

  • If you download multiple .zip files, the size limit is 10GB per .zip file and 20GB overall.

You can delete specific files or photos on Microsoft OneDrive, or you can delete entire folders and all the items in them. If you need to, you might be able to restore deleted files from the OneDrive recycle bin.

Note: If you want to remove files from your local computer while still keeping them on OneDrive, or vice versa, see Delete items from your OneDrive, your hard drive, or both.

  1. Go to the OneDrive website. You might need to sign in with your Microsoft account, or your work or school account.

  2. Select the files or folders you want to delete by pointing to each item and clicking the circle check box that appears. (The left image below shows items in List view, the right image shows items in Tiles or Photos view.)

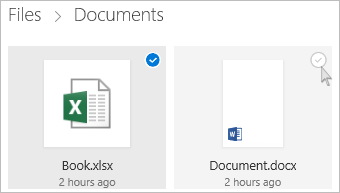
    Screenshot of selecting a file in OneDrive in tile view

  3. To select all files in a folder, click the circle to the left of the header row, or press CTRL + A on your keyboard. (You can also select several files at once by selecting one file, scrolling down the list, then hold down the Shift key while left-clicking the last item you want to select.)

  4. On the bar at the top of the page, select Delete. (You can also right-click the selected file or folder and select Delete.)

    Note: If you do not see the Delete icon in the top navigation bar, or when you right-click a selected item, you may not have permission to delete that file or folder.

  5. To delete a folder, rather than just its contents, you may need to go up or back a level to select the whole folder.

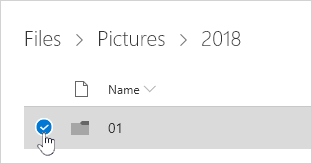
    Selecting a OneDrive folder

    Selecting a OneDrive folder

    Notes:

    • A personal OneDrive folder does not need to be empty before you delete it. However, you may want to check beforehand that there are no files or sub-folders within it that you want to keep.

    • With OneDrive for work or school accounts, a folder must be empty before you can delete it, if your admin has enabled retention in OneDrive for work or school accounts.

Empty your recycle bin

Your deleted files and folders go to the OneDrive recycle bin from which you can restore files if you need to.

First, select Recycle bin in the OneDrive left side navigation.
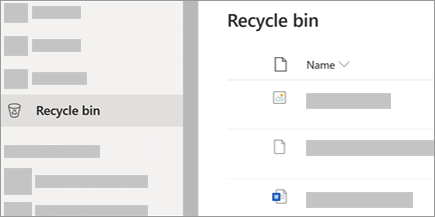
A screenshot showing the Recycle Bin tab in OneDrive.com.

  • To permanently delete specific files or folders from the recycle bin, select those items, then select Delete in the top navigation.

  • To permanently delete the entire recycle bin at once, select Empty recycle bin in the top navigation.

Note: Once you delete files from the OneDrive recycle bin, there may be a short delay in seeing that reflected in your OneDrive account's storage availability.

Delete items from your OneDrive, your hard drive, or both

Delete from your OneDrive but not your hard drive

If you want to keep a file, photo, or folder on your computer, but not on OneDrive, use File Explorer (or Mac Finder, if you're on a Mac) to move the file outside your OneDrive folder to a different folder on your hard drive.

Delete from your hard drive but not your OneDrive

If you want to keep a file, photo, or folder on your OneDrive, but not on your computer (because you don’t want it to take up space), put the file in your OneDrive folder, then turn on Files On-Demand (Windows) (or Files On-Demand (Mac)). You’ll still see the file in the OneDrive folder on your computer, but it will take up zero hard drive space.

Delete from both your OneDrive and your hard drive

If you have synced your OneDrive to your desktop/hard drive, use File Explorer (or Mac Finder, if you're on a Mac) to find and delete the file, photo, or folder.

Items cannot be deleted from within your Recent list, only removed.

Note: These instructions apply only if you are signed in with a Microsoft account (OneDrive for home). They don't apply to OneDrive for work or school.

  • To remove items from your Recent view, select the files or folders you want to remove by pointing to each item and clicking the circle check box that appears. On the bar at the top of the page, select Remove.

  • To delete an item in your Recent list, go to the folder in which the item is located. To find the folder, look at the item's Details to see the exact Path.

Open the Shared view, and select the files or folders you want to remove by pointing to each item and clicking the circle check box that appears.

To remove an item shared by other users, select the item, then select Remove from shared list on the bar at the top of the page.

To remove an item from Shared by me, select the item, select Information Information in the upper-right corner to open the Details pane, and then select Manage Access.

  • For files shared with a link, select Anyone with this link... and then select Remove Link.

  • For files shared with other people, select Can Edit or Can View under their name and then select Stop Sharing.

    Tips:

    • If you cannot see the Shared information, you may have more than one item selected. Select just one item to change sharing.

    • For more information, read Stop sharing OneDrive files or folders or change permissions.

  1. On your taskbar, select File Explorer The File Explorer icon..

  2. Select your OneDrive folder, select the items you want to delete, and press the Delete key on your keyboard.

  1. Open a Mac Finder window.

  2. Navigate to the correct OneDrive folder, and select the item or items you want to delete.

  3. Right-click the item or items, then select Move to Trash. You can also drag and drop the item or items from the folder to your Trash.
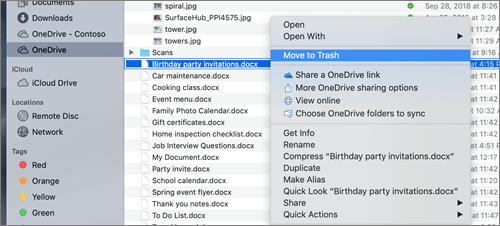
    Right-click menu selection for deleting a file from OneDrive in Mac Finder

If you accidentally delete a file or folder in OneDrive, you may be able to recover it later from the OneDrive recycle bin.

Go to the OneDrive website, and sign in with either your Microsoft account or your work or school account.

  1. In the navigation pane, select Recycle bin.

    A screenshot showing the Recycle Bin tab in OneDrive.com.

  2. Select the files or folders you want to restore by pointing to each item and clicking the circle check box that appears, and then click Restore.

    Tip: If you're using OneDrive with your personal account, you can select Restore all items to restore everything in your recycle bin. This option isn't available in your work or school OneDrive. Files deleted from your Personal Vault will only show up in your recycling bin if your Personal Vault is unlocked before you check the recycle bin. You can use the Show Personal Vault items command in the recycle bin to unlock the Personal Vault and see those items.

    OneDrive Recycle Bin view showing the 'Show personal vault items' option

    Notes:

    • If you're signed into OneDrive with a Microsoft account, items in the recycle bin are automatically deleted 30 days after they're put there.

    • If you're signed in with a work or school account, items in the recycle bin are automatically deleted after 93 days, unless the administrator has changed the setting. See more information about how long deleted items are kept for work or school accounts.

Restore deleted files or folders from your computer

If you deleted the files or folders from your OneDrive, check your Recycle Bin (Windows) or Trash (Mac) to see if your files are there.

Notes:

  • Deleted online-only (OneDrive online only icon) files will not appear in your computer's Recycle Bin or Trash.

  • If you get an email or notification saying "[Folder name] was removed from your OneDrive" it means that a shared folder was deleted. You will not be able to restore or recover a folder shared with you. If you shared a folder with other people and they deleted its contents, you can find the contents in your recycle bin.

  • To restore files from your Recycle Bin in Windows, open the Recycle Bin, select the files or folders you want to recover, then right-click them and select Restore. The file or folder will be restored to its original folder.

    Right-click menu to recover a deleted file from Recycle Bin

  • To restore files from your Trash on a Mac, open the Trash, select the files or folders you want to recover, then right-click them and select Put back. The file or folder will be restored to its original folder.

    Right-click menu to recove a file from Trash on a Mac

With version history, you can see and restore older versions of your files stored in OneDrive or SharePoint. Version history works with all file types, including Microsoft 365 files, PDFs, CAD files, photos, videos, and more. If you need to, you may be able to restore deleted OneDrive files or restore deleted SharePoint items from the recycle bin.

  1. Sign in to OneDrive with your personal Microsoft account or your work or school account.

  2. Select the file that you want to restore to an earlier version (you can only restore one file at a time), right-click, then select Version history.

    Note: In Classic view, select the document, then at the top, select More > Version History.

  3. In the Version History pane, do one of the following:

    If you're signed in to OneDrive or SharePoint with a work or school account (such as a Microsoft 365 account), select the ellipses (...) next to the version of the document that you want to restore, and then click Restore.

Version History pane

In Classic view or previous versions of SharePoint Server, select the arrow next to the version of the document that you want to restore, and then click Restore.

Select 'Restore' from the drop-down menu for a selected document version

Use Version history in File Explorer

If you have the OneDrive sync app installed on your PC, right-click the file that you want to restore to an earlier version in File Explorer and select Version history. Then select the ellipses (...) next to the version you want and click Restore.

File Explorer menu including the Version history option.

The document version you selected becomes the current version. The previous current version becomes the previous version in the list.

Notes:

  • If you're signed in to OneDrive with a Microsoft account, items in the recycle bin are automatically deleted 30 days after they're put there. If your recycle bin is full, the oldest items will be automatically deleted after three days. If you're signed in with a work or school account, items in the recycle bin are automatically deleted after 93 days, unless the administrator has changed the setting.

Important: Beginning January 1, 2022, we are ending support for selected OneDrive desktop apps running on Windows 7, 8, and 8.1.

With OneDrive, you can sync files between your computer and the cloud, so you can get to your files from anywhere - your computer, your mobile device, and even through the OneDrive website at OneDrive.com. If you add, change, or delete a file or folder in your OneDrive folder, the file or folder is added, changed, or deleted on the OneDrive website and vice versa. You can work with your synced files directly in File Explorer and access your files even when you’re offline. Whenever you’re online, any changes that you or others make will sync automatically.

Install and set up

  1. If you're using Windows 10, your computer already has the OneDrive app installed - skip to step 2.

    If you don't have Windows 10 or Office 2016, install the Windows version of the new OneDrive sync app.

  2. Start OneDrive Setup.

If you have no accounts signed in to OneDrive

If you don’t currently have an account signed in to OneDrive, use these instructions to start OneDrive.

  1. Select the Start button, search for “OneDrive”, and then open it:

    • In Windows 10, select OneDrive.

      Screenshot of searching for the OneDrive desktop app in Windows 10

    • In Windows 7, under Programs, select Microsoft OneDrive.

      Screenshot of searching for the OneDrive desktop app in Windows 7

    • In Windows 8.1, search for OneDrive for Business, then select the OneDrive for Business app.

  2. When OneDrive Setup starts, enter your personal account, or your work or school account, and select Sign in.

    Screenshot of the first screen of OneDrive Setup

Key points in OneDrive Setup

There are two screens in OneDrive Setup that are helpful to watch for:

  • On the This is your OneDrive folder screen, select Next to accept the default folder location for your OneDrive files. If you want to change the folder location, select Change location - this is the best time to make this change.

    The This is Your OneDrive Folder screen in the Welcome to OneDrive wizard

  • On the All your files, ready and on-demand screen, you'll see how files are marked to show them as online-only, locally available, or always available. Files On-Demand helps you access all your files in OneDrive without having to download all of them and use storage space on your Windows device. Select Next.

    The Files on Demand screen in the Welcome to OneDrive wizard

Note: If you were already syncing OneDrive for work or school to your computer (using the previous sync app) and you've just installed the sync app, you won't see the This is your OneDrive folder or the Sync files from your OneDrive screen during OneDrive Setup. The sync app automatically takes over syncing in the same folder location you were using before. To choose which folders you're syncing, right-click the blue cloud icon in the taskbar notification area, and select Settings > Account > Choose folders.

See and manage your OneDrive files

You're all set. Your OneDrive files will appear in File Explorer in the OneDrive folder. If you use more than one account, your personal files appear under OneDrive – Personal and your work or school files appear under OneDrive - CompanyName.

Screenshot of OneDrive for Business files in File Explorer

You now have a new white or blue cloud icon (or both) in your notification area and your files are synced to your computer. Your blue cloud icon will appear as OneDrive – [YourTenantName] when you hover over the icon.

OneDrive for Business sync client

Note: Contoso is an example name - yours will show the name of your organization.

Any time you want to change the folders you sync on your computer, right-click that cloud icon in the taskbar notification area, and select Settings > Account > Choose folders. Find other information about your account and change other OneDrive settings from here.

OneDrive add account dialog

Need to lock a document or make a document read only? if you're the file owner you can lock the document or make it read only. You can also see who has access, change access permissions, or simply stop sharing it.

Note: You can't change the permission of a sharing link from edit to view or from view to edit. The way around it is to delete your sharing link and create a new one with a different permission.

Stop or change sharing

Files and folders can be shared by sending someone a sharing link, or by giving them direct access to the file or folder. (People may also have access to a file or folder if they've been given access to the site itself.)

If you are the file owner, you can stop sharing the file or folder.

If someone has been given direct access, or has access through a specific people link, you can also change the sharing permissions between view and edit.

Here are the steps:

  1. Select the file or folder you want to stop sharing.

  2. Select Information Information in the upper-right corner to open the Details pane.

    Note: (The Information icon is just below your profile picture. If you don't see it, make sure you only have one file or folder selected - it won't display if you have multiple items selected.)

  3. On the Details pane, under the Has Access header, you'll see the People icon, the Links icon, and/or the Email icon. These options vary depending on how you have shared the file or folder. Select Manage access and:

    • To stop sharing the file entirely, click Stop sharing.

    • To delete a sharing link, click the ... next to the link, then click the X next to the link to remove it. (You'll get a prompt asking you if you're sure you want to delete the link - if so, click Delete link.)

    • To stop sharing with specific people, expand the list under a specific people link and click the X to remove someone.

    • To change permissions or stop sharing with someone who has direct access, under Direct Access, click the dropdown next to the person's name and choose the option that you want.

Screenshot of the manage access panel showing sharing links. Screenshot of direct access links

Tip: You can also manage a file or folder's sharing permissions through the OneDrive desktop app for Windows 7, Windows 10, and Mac. All you need to do is right-click the shared file or folder in your OneDrive folder on your computer, and select Share, then select More The More Options button on OneDrive.com. > Manage access, and a dialog box will open on your desktop so you can make your selections as described above in step 3.

See the items you've shared

On OneDrive.com, select Shared in the left pane, and then select Shared by me.

Haven't found the answer? We can help.

Submit a request

Contact us and we’ll get back to you as soon as possible.

...